Client Approval Checklist: 8 Steps to Faster Sign-Off
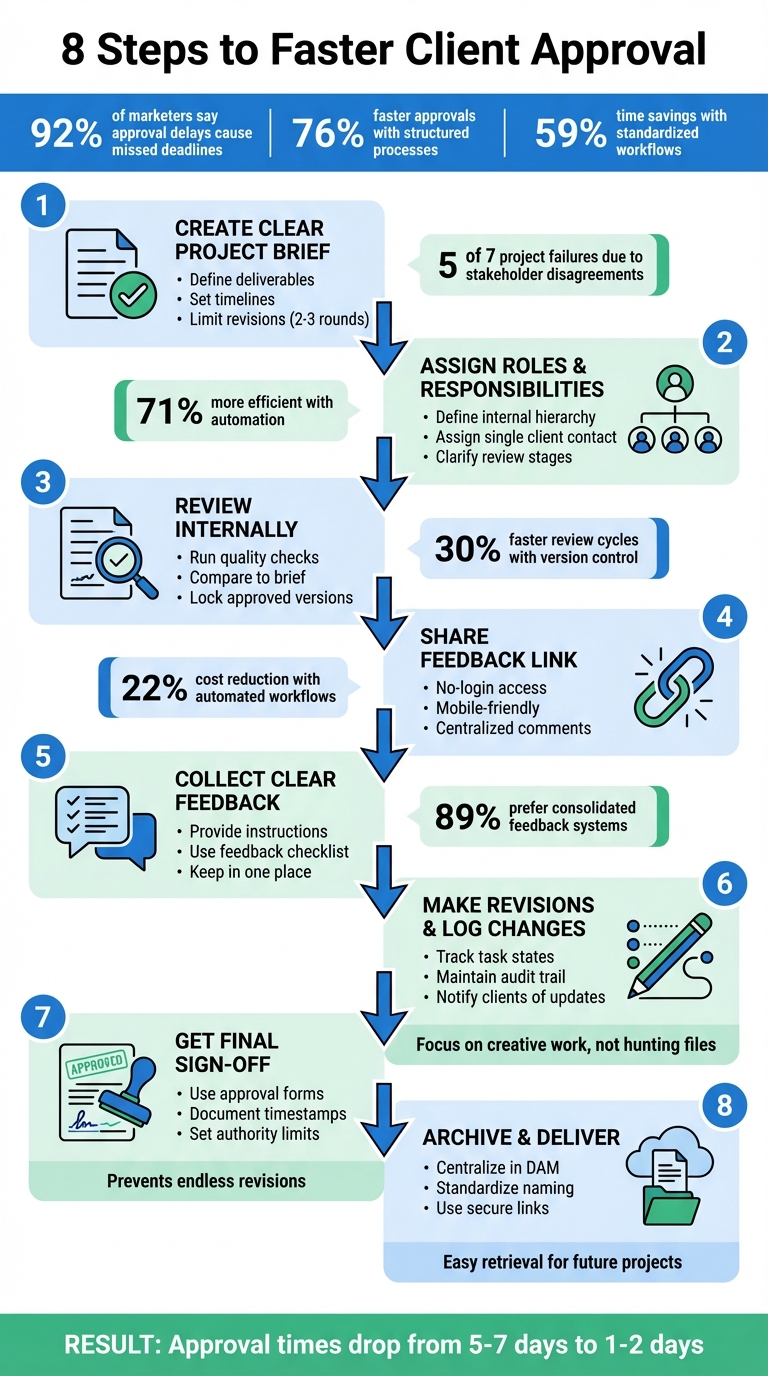
Delays in client approvals are a common reason teams miss deadlines - 92% of marketers agree. Without a clear process, feedback gets lost, revisions pile up, and projects drag on. This guide breaks down 8 practical steps to help you avoid these roadblocks, improve communication, and get sign-offs faster:
- Start with a clear project brief: Define deliverables, timelines, and revision limits upfront. Get written approval before work begins.
- Assign roles: Clarify who reviews what to avoid conflicting feedback.
- Review internally first: Catch mistakes and ensure quality before sharing with clients.
- Simplify client feedback: Use tools that centralize comments and make it easy for clients to review files.
- Guide client input: Provide instructions to ensure actionable feedback that aligns with goals.
- Track revisions: Turn feedback into tasks, log changes, and notify clients of updates.
- Secure final approval: Use standardized forms and document sign-offs to close the project.
- Organize and deliver files: Archive final assets systematically and share them securely.
8-Step Client Approval Process for Faster Sign-Off
Get Client Approval the FIRST TIME with The One Concept Method | (The BEST Decision I made)
Step 1: Create a Clear Project Brief and Set Expectations
A clear project brief is the foundation for smooth approvals. Without it, teams often encounter conflicting feedback, scope creep, and endless revisions. In fact, disagreements among stakeholders over project specifics are responsible for five out of the seven main reasons why projects fail. Treat the brief as the first official version of your project - getting it approved in writing ensures everyone is on the same page regarding requirements.
This clarity at the outset minimizes miscommunication and sets the stage for a streamlined process.
Write a Complete Project Brief
Your project brief should be detailed and measurable. Specify exact deliverables, such as an "11"x17" folding 3-panel brochure" or a "5-page WordPress site", instead of vague descriptions. Clearly outline your target audience, including demographics, and define the specific action you want them to take. Incorporate brand guidelines, such as Pantone colors, font families, and tone of voice. Timelines should include specific deadlines for initial drafts, revision rounds, and final delivery.
Creative work should only begin after receiving the client’s written approval. Make sure to secure formal written sign-off on the brief and have the client appoint a single feedback liaison. This avoids conflicting instructions and streamlines communication.
Set Revision Limits
Include a fixed number of feedback rounds - typically two or three - in your project brief or contract. Without limits, projects can spiral into endless minor tweaks. Clear revision limits encourage clients to provide focused, consolidated feedback.
"Talk about the process up front with the internal team and then with the client. Tell them what is going to happen, get them to talk about it, internalise what they need to do and think through the best way to do it; don't assume it will just happen." - Paul Pantzer, Project Manager, Hill Holliday
By setting these limits, you protect your team’s time and keep the project within budget. Organizations that standardize their approval processes and use structured checklists can cut up to 59% of the time spent on proofing workflows.
Once you’ve nailed down the brief and revision limits, the next step is to define roles and responsibilities to keep everything on track.
Step 2: Assign Roles and Responsibilities
When roles aren’t clearly defined, the approval process can spiral into chaos. Multiple reviewers without clear boundaries often lead to duplicate edits and conflicting feedback. The fix? Assign clear responsibilities to both your team and your client's stakeholders before the project kicks off.
Define Internal Team Roles
Within your team, establish a clear review hierarchy. Start with strategic stakeholders - like creative directors or team leads - who can validate the overall direction and ensure alignment with the brief. Then, bring in granular reviewers - such as copyeditors or legal teams - later in the process to focus on details, avoiding wasted effort on elements that might still change.
To keep things organized, appoint a "consolidator" who gathers and unifies all internal feedback. This way, the client only sees polished, cohesive input rather than unresolved internal disagreements.
Before sharing files externally, always conduct a formal Quality Control (QC) review. Harold Shields from Ivey Performance Marketing stresses that proof files should only reach clients after passing QC, ensuring they’re polished and ready for review. Interestingly, teams that incorporate automation into their workflows are 71% more likely to achieve efficient creative reviews and surpass manager expectations.
This internal structure lays the groundwork for smoother client collaboration.
Clarify Client Responsibilities
Your client also needs clear roles. Assign a single point of contact to consolidate feedback from their team. This person acts as the gatekeeper, ensuring your team doesn’t receive conflicting input from different departments. Define specific reviewer roles: C-suite stakeholders for mission alignment, technical experts for accuracy, and brand managers for consistency.
"Establish up front that their [C-suite] approval is only needed to validate that the asset is in keeping with the company mission."
Daniel Perez, Head of SaaS Division at Aquent, advises limiting the C-suite’s involvement to avoid unnecessary delays over minor details. Additionally, provide clients with clear review criteria for each stage - whether it’s "verify factual accuracy" or "approve the color palette." This clarity can accelerate content approvals by as much as 76%.
Step 3: Review Internally with Version Control
Before sharing deliverables with clients, it's crucial to validate them internally. This step helps catch errors, ensures brand standards are upheld, and minimizes unnecessary revision cycles. Paul Pantzer, Project Manager at Hill Holliday, underscores the importance of clear processes:
"Talk about the process up front with the internal team and then with the client. Tell them what is going to happen... don't assume it will just happen".
Run Quality Checks
Start by comparing your deliverable against the original project brief to ensure it aligns with the project's goals. A compliance checklist can be a lifesaver, especially in industries like healthcare or finance where a simple mistake could lead to fines or other regulatory issues. This checklist should cover branding, legal requirements, and any procedural guidelines.
Harold Shields, Workflow Analyst at Ivey Performance Marketing, shares how his team approaches this step:
"Our workflow system loads proof files... immediately after the QC process. Clients with Dashboard access can see a concise summary of proofs needing their attention... This helps the clients prioritize their reviews."
Shields' team ensures that files only go to clients after passing internal quality checks, guaranteeing that clients receive polished, ready-to-review materials. To streamline feedback, prepare a mini brief for each version, complete with a clear purpose and a checklist. This keeps feedback focused and relevant.
Track Changes with Version Control
A centralized version control system can eliminate the confusion caused by scattered email threads and poorly named files. By logging all changes with timestamps and user names, you create a reliable audit trail. Tools that offer side-by-side comparisons and outdated version alerts help ensure updates are implemented correctly.
Once a version meets all internal requirements, lock it to prevent additional comments or last-minute changes that could derail the process. Research indicates that using online proofing software with structured version control can cut review cycles by up to 30%. Additionally, 89% of creative professionals prefer having feedback, deadlines, and tasks consolidated in one place.
With version control in place, the deliverable is polished and ready for the next step: sharing it with the client for review.
Step 4: Share a Client-Ready Feedback Link
After completing your internal checks, it’s time to share your work with the client. How you present your work can greatly impact how quickly it gets approved. A hassle-free feedback link can speed up responses by removing unnecessary technical barriers.
Create a Feedback Link
Provide a link that allows clients to view and comment on your work without needing to create an account or remember passwords. These "Magic Links" offer secure access to files - whether web pages, images, PDFs, or videos - while keeping all feedback in one centralized location. The goal is to make it easy for clients to comment directly on specific elements of the design.
The stats speak for themselves: 92% of marketers say approval delays are the main reason deadlines are missed. However, teams using dedicated approval tools see 76% faster content approvals. Additionally, companies that automate workflows reduce costs by 22% and achieve quicker response times. The difference lies in removing unnecessary obstacles. As Cody Miles, Founder of Ashore, explains:
"Any misunderstandings or confusion during the proofing process will ultimately drag it out".
By sharing work in a way that’s easy to access and comment on, you set the stage for smoother client interactions.
Make Client Interaction Simple
Keep things straightforward - clients should be able to click, comment, and be done. Avoid complicated onboarding processes or dashboards that could frustrate them. Research shows that 32% of customers will abandon a service after just one poor experience, emphasizing the importance of a seamless review process.
Ensure your feedback link is mobile-friendly, allowing busy stakeholders to review and approve content from anywhere. Automate reminders to prompt timely feedback. For sensitive projects, you can add extra security features like password protection or disable file downloads to safeguard intellectual property while keeping the review process easy. A streamlined approach encourages faster and more efficient client feedback.
sbb-itb-32f6eb2
Step 5: Collect Clear Client Feedback
Once clients start reviewing your work, the quality of their feedback can significantly impact how smoothly the project progresses. Vague comments like "make it pop" often lead to confusion and unnecessary revision cycles. The key is to guide clients in providing actionable feedback and ensure all input is centralized.
Give Feedback Instructions
Clients may not naturally know how to give precise feedback, so it’s essential to provide clear instructions. Before any review begins, ask clients to revisit the project brief to ensure their feedback aligns with the original goals and strategy. This step helps avoid feedback that strays off course and keeps the focus on what matters.
Encourage clients to answer three specific questions when identifying issues: What is the problem? Why is it a problem? What qualities should an alternative have?. For instance, instead of saying, "I don't like this", they might say, "The headline is hard to read against the background due to low contrast - we need something easier to read, especially on mobile."
Another critical point: ask clients to describe the problem instead of prescribing solutions. For example, if a client says, "Change the font to 14pt Arial", they’re suggesting a fix without explaining the issue. Instead, they could say, "The text is hard to read", allowing your team to use their expertise to find the best solution. Also, discourage the use of vague terms like "better" or "stronger" unless paired with specific explanations, as these words can be interpreted in many ways.
To make the process even smoother, provide a feedback checklist tailored to each review stage. For example, in the first draft, clients might focus on layout, while later rounds could prioritize content accuracy. A simple table like the one below can help guide their input:
| Review Category | What to Evaluate |
|---|---|
| Visual Elements | Layout, color scheme, typography, and imagery |
| Functionality | User experience, navigation, and responsiveness |
| Brand Alignment | Consistency with brand guidelines and messaging |
| Content | Accuracy, clarity, tone of voice, and relevance |
Once clients have clear guidelines, consolidating all feedback in a single location becomes essential.
Keep Feedback in One Place
Centralizing feedback ensures clarity and avoids conflicting instructions. When feedback is scattered across emails, chat apps, and calls, it creates unnecessary confusion. In fact, 89% of creative professionals prefer an approval process that organizes feedback, tasks, and deadlines in one place.
Using a centralized platform for feedback simplifies the process. Visual markup tools, for instance, allow clients to annotate designs directly. Harold Shields, Workflow Analyst at Ivey Performance Marketing, highlights the benefits:
"Using Workfront allows Ivey to deliver proofs to our clients instantaneously... Clients with Dashboard access can see a concise summary of proofs needing their attention".
Centralized feedback also promotes transparency. When all stakeholders can view each other’s comments, contradictory input naturally decreases. Additionally, automated version control ensures everyone works on the latest draft while keeping earlier feedback archived for reference. This approach can save significant time - teams using automated tools report a 50% reduction in manual effort during reviews.
To keep the process on track, set firm deadlines for each feedback stage and use automated reminders to ensure accountability. When clients know exactly when their feedback is due and how delays could impact the timeline, they’re more likely to provide focused, timely input. This structure supports the efficient workflows you’ve already established in earlier steps.
Step 6: Make Revisions and Log Changes
After gathering feedback and managing internal version control, the next step is to handle revisions in a way that’s both efficient and transparent. To avoid confusion or duplicate efforts, it’s essential to turn feedback into actionable tasks that can be tracked. Scattered files or emails can lead to missed edits, so keeping everything organized is key.
Track Feedback with Task States
Transform client comments into a structured checklist with task states like "To Do", "In Progress", and "Resolved." This creates a clear system for tracking progress and ensures accountability. Using a centralized platform to archive drafts automatically provides a single, reliable source of truth.
For instance, one agency managed to streamline 50 campaigns annually by automating version control and file publishing. Zach Hobesh, Chief Post Officer at Sandwich, shared his perspective:
"Whatever can be automated, do it. That way we can focus on actually doing the comp or the creative work - not tracking down mistakes or hunting for files."
To maintain accountability, keep an audit trail that includes timestamps and reviewer names. Once a version is approved, lock the asset to prevent out-of-scope or last-minute feedback. This step sets a clear boundary, signaling the end of the revision process and protecting your team from unnecessary scope changes.
When revisions are complete, make sure to notify clients right away so they can review the updates without delay.
Notify Clients of Updates
After revisions are logged and finalized, it’s important to inform clients promptly. Provide a clear summary of the changes so they can quickly verify the updates.
Automated notifications can streamline this process, reducing the need for manual follow-ups and keeping projects on track. For example, Harold Shields, Workflow Analyst at Ivey Performance Marketing, highlighted how automation has improved their efficiency:
"Using Workfront allows Ivey to deliver proofs to our clients instantaneously... Clients with Dashboard access can see a concise summary of proofs needing their attention".
When you implement feedback, take the time to explain the reasoning behind your decisions. Sharing data or insights to justify changes can build trust and position your team as strategic collaborators rather than simple task executors. This approach minimizes back-and-forth communication and reinforces your expertise.
Step 7: Get Final Sign-Off
Once all revisions are complete, the next crucial step is obtaining formal client approval. This step ensures clarity, prevents endless back-and-forth, and marks the official end of the project.
Use Approval Forms
Ditch scattered email confirmations in favor of a standardized approval form. This form should include key project details, deliverables, technical specifications, and client contact information. Add a verification checklist where clients can confirm critical elements like imagery, layout, color accuracy, resolution, and spelling. To avoid disputes later, include a legal disclaimer stating that the signature signifies acceptance of the work "as is", transferring responsibility for any missed errors. Before rolling it out widely, test the form with a small group of clients to ensure it’s clear and effective. Also, establish early in the process which stakeholders have the authority to give the final sign-off.
Paul Pantzer, Project Manager at Hill Holliday, emphasizes the importance of communication:
"Talk about the process up front with the internal team and then with the client. Tell them what is going to happen, get them to talk about it... don't assume it will just happen".
Setting a clear limit on revisions - typically two or three rounds - can also help avoid delays caused by unnecessary, repetitive changes.
Document Final Approvals
Keep a detailed record of all approvals. Use digital tools to log timestamps, reviewer names, and version details, creating an audit trail. Store everything - versions, feedback, and final sign-offs - in one centralized location to avoid losing key documents or emails. Automated notifications can remind clients when their sign-off is pending, keeping the project on track.
Studies show that structured approval processes can reduce review cycles by 30% and address the 92% of delays that stem from approval issues. By formalizing this process, you ensure accountability, minimize delays, and provide clarity about when the project is officially complete.
Step 8: Archive and Deliver Final Assets
Once you've secured the final approval, the next step is to systematically organize the approved assets to avoid future headaches. Store all finalized files in a centralized Digital Asset Management (DAM) system or a reliable cloud-based platform. This ensures your team can easily find them when needed. Using automatic versioning is key here - it keeps your archive clean and prevents anyone from accidentally working on an outdated file. A well-maintained archive not only boosts efficiency but also ensures a smooth and secure delivery process.
Organize and Store Assets
It's essential to set clear access permissions to control who can view or edit files, especially when dealing with sensitive client work. Keeping an audit trail is equally important - this records every comment, edit, and approval, creating a reliable history for reference. Clients often revisit past projects or need to verify approvals, so having this documented trail can save a lot of time and trouble. Stick to the same level of discipline with version tracking as you did in earlier review stages. A cloud storage system with robust search functionality can also make locating files much faster.
To avoid confusion, standardize your file-naming conventions. Align version numbers with review rounds (e.g., "Round 1", "Round 2") rather than using vague or arbitrary names. Ensure that feedback and annotations are directly tied to specific file versions, so comments remain relevant even months later. For added security, enable ransomware protection through your storage provider. Many enterprise storage solutions now offer features like automatic threat detection and file recovery, which are invaluable for safeguarding your archives.
Deliver Final Files
With everything securely archived, it's time to deliver the final assets. Use secure, shareable links to avoid any version mix-ups. Opt for password-protected or one-time access links to prevent unauthorized sharing. Along with the files, include a brief summary that outlines how the work meets the project’s requirements.
Harold Shields, a Workflow Analyst at Ivey Performance Marketing, shares how their process ensures smooth delivery:
"Using Workfront allows Ivey to deliver proofs to our clients instantaneously... Clients with Dashboard access can see a concise summary of proofs needing their attention and counts for proofs that are late or in danger of being late".
This kind of streamlined delivery can help avoid unnecessary delays. Research shows that 92% of marketers cite approval delays as a major reason for missed deadlines. Adopting online proofing tools can cut review cycles by as much as 30%, keeping projects on track.
Conclusion
By following these eight steps, you can turn the approval process into a streamlined and efficient workflow. Centralizing feedback, assigning clear roles, and setting revision limits upfront can eliminate the chaos of scattered emails and conflicting comments that often derail creative projects.
Organizations that adopt structured workflows report saving as much as 59% of the time typically spent managing approvals. The secret lies in reducing client friction while maintaining internal control. Tools like BoastImage make this possible by allowing clients to provide feedback with just a click - no accounts, logins, or training required. While clients enjoy a straightforward interface, your team benefits from features like version control, task tracking, and a detailed audit trail. This approach also addresses a critical issue: 51% of workers spend at least two hours daily on repetitive tasks that could be automated.
Industry experts back this method. Shane McEvoy, MD at Flycast Media, highlights the power of structured workflows:
"Our approval workflow succeeds because it prioritizes clarity and accountability at each stage... This transparency ensures that everyone knows what's expected and prevents bottlenecks."
With clear expectations and client-friendly tools, average approval times can drop from 5–7 business days to just 1–2 business days.
When you implement these steps, you’ll not only speed up delivery but also improve client satisfaction. Teams can focus more on creative work, while clients gain clarity and projects stay on track. The result? Fewer revisions, happier clients, and consistently met deadlines.
FAQs
How do I set clear revision limits to keep projects on track?
Setting clear limits on revisions is crucial for keeping your project on track and avoiding endless back-and-forth. Start by outlining the number of review rounds in your project agreement or kickoff email. For example, you could specify Round 1: Initial concepts and Round 2: Refined mock-ups. When clients know upfront how many revision rounds are included, they’re more likely to focus their feedback and consolidate their input effectively.
To reinforce these limits, pair them with a timeline and a clear policy: once the agreed number of revisions is reached, any additional changes are treated as new work and billed at your standard rate (e.g., $150 per hour). This approach not only ensures transparency but also encourages clients to stay within the set boundaries. If extra revisions are requested, you can refer back to the original agreement and issue a formal change order.
Using tools like annotated PDFs or comment-enabled mock-ups can also streamline the feedback process by capturing all input in one place, reducing the chances of recurring issues. By setting clear limits, sticking to timelines, and maintaining transparent policies, you create a more efficient and hassle-free approval process for everyone involved.
What are the best tools to streamline client feedback and approvals?
Using the right tools can make handling client feedback and approvals much smoother and more efficient. A cloud-based platform works perfectly for keeping comments, version histories, and approvals all in one place. This way, you can say goodbye to messy email chains and ensure everything is easily accessible for both your team and your clients.
For design-related projects, tools that enable direct markup on files, such as PDFs or visuals, are incredibly useful. Features like timestamped comments and version control are particularly valuable when working on videos or other creative tasks. Additionally, approval systems with shared dashboards can simplify the process by consolidating feedback, managing deadlines, and making sure every comment reaches the right person.
By integrating tools designed with clients in mind, you can streamline communication, avoid unnecessary delays, and keep projects running smoothly.
Why is it important to assign clear roles in the client approval process?
Assigning clear roles in the approval process is like setting the stage for a well-rehearsed performance - everyone knows their part, whether it’s drafting, reviewing, or giving the final sign-off. This level of clarity eliminates confusion, speeds up decisions, and ensures every team member is accountable for their tasks.
When everyone understands their responsibilities, it reduces the chances of irrelevant or incomplete feedback that can bog down the process. By establishing these expectations early - ideally in a kickoff meeting - you set the tone for a smoother workflow, fewer unnecessary revisions, and projects that stay on schedule for quicker approvals.