How to Manage Annotation Versions in Design Projects
Tired of losing time to version chaos? Managing annotation versions in design projects can be a nightmare when files, feedback, and edits are scattered across emails, Slack, and screenshots. The result? Missed updates, wasted hours, and frustrated teams.
Here’s the fix:
- Use clear naming conventions: Stick to formats like
ProjectName_v01_MM-DD-YYYYto avoid confusion. - Set up version control: Sequential (v1, v2) or semantic (v1.1.0) systems help track changes and prevent working on outdated files.
- Centralize feedback: Use a single platform to collect all comments and edits, reducing scattered input.
- Leverage comparison tools: Side-by-side views and visual diff tools make it easier to spot changes and speed up reviews. You can also use a visual project analyzer to identify areas for improvement.
Why it matters: 78% of agencies struggle with client communication, and poor version management is often the root cause. Following these steps can save time, improve collaboration, and keep projects on track.
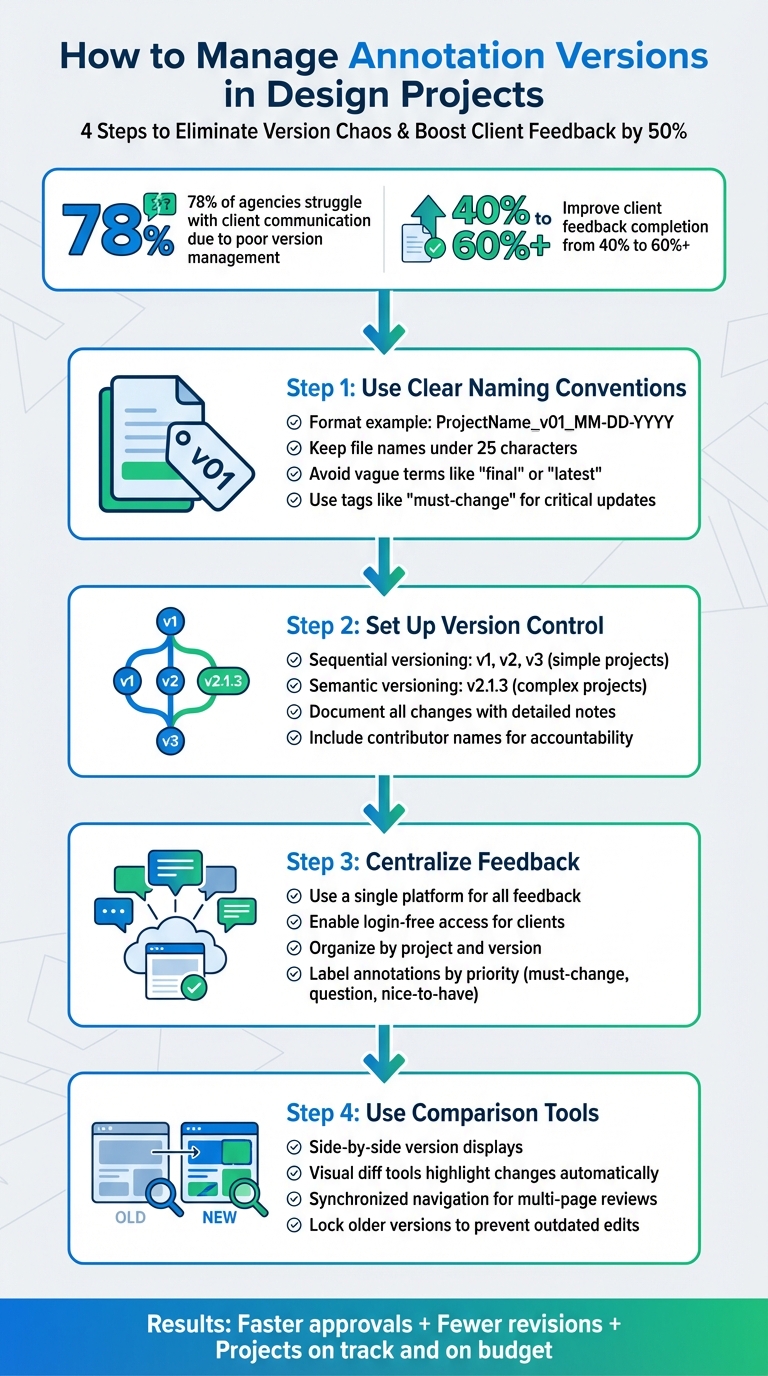
4-Step Process for Managing Annotation Versions in Design Projects
Better Figma Design System Management and Documentation
sbb-itb-32f6eb2
Set Up Consistent Naming Conventions for Annotations
Having a clear naming system is essential to avoid version mix-ups. When your team sticks to a shared format, it eliminates confusion about which file is the most recent and what changes have been made.
Create Standard Naming Formats
Stick to a consistent format that includes ProjectName, Version (e.g., v01, v02), and Date (MM-DD-YYYY). Keeping file names under 25 characters ensures they won't get cut off in design tools. This setup makes it easy to identify the project, version, and date at a glance.
If you need to provide more context, add a brief description - under 140 characters - to highlight changes or reference specific milestones.
Avoid vague terms like "final" or "latest" for versioning. Instead, use clear labels like "v01" or "v02" to maintain chronological order. For feedback prioritization, include tags like "must-change" to signal critical updates.
Get Your Whole Team to Use the Same System
A naming convention only works if everyone on the team follows it. To prevent confusion, limit version naming permissions to team members with edit access. For example, in Figma, you can save milestone versions using shortcuts like Cmd + Opt + S (Mac) or Ctrl + Alt + S (Windows).
Centralize design feedback and revisions by using a single platform where everyone can collaborate in real time. When clients and stakeholders can leave feedback directly on the design - without needing accounts or downloads - it eliminates the chaos of email attachments and renamed files. This simple step can improve client feedback completion rates to 60%, compared to the 40% industry standard.
Finally, make sure all annotation feedback is stored in one place to keep your workflow efficient and organized.
Set Up a Clear Version Control System
A strong version control system is essential for keeping your workflow organized and accountable. Without it, teams can waste hours dealing with outdated files, unclear edits, and confusion over who made changes and when. Version control ensures you can roll back to earlier iterations if something goes wrong - whether a new direction doesn't pan out or assets are accidentally deleted.
The stakes are high: 78% of agencies cite client communication as their biggest challenge, often due to version-related confusion. By introducing a streamlined version control system, you can boost client feedback completion rates to over 60%, compared to the industry average of 40%.
The next step is selecting a versioning method that fits your project's needs.
Use Sequential or Semantic Versioning
Sequential versioning (v1, v2, v3) is straightforward and works well for most design projects. It consolidates comments and changes into a single review space, making it easier to track progress. This approach also aligns perfectly with standardized naming conventions.
For more complex projects, semantic versioning offers a more detailed structure, using a major.minor.patch format to differentiate between large updates, minor changes, and quick fixes. For instance, v2.1.3 would indicate the second major revision, first minor update, and third small fix. To keep your review process clean, lock older versions to prevent further edits or feedback once a new version is uploaded. Additionally, provide easy access to earlier versions - such as through a dropdown menu - so users can track the evolution of the design.
After choosing a versioning method, it's crucial to document every change thoroughly.
Document Changes in Each Version
Every version should come with detailed notes explaining what was updated and why. This creates a clear audit trail that shows how the design evolved and captures stakeholder preferences along the way. Including the name and avatar of the main contributor for each update adds another layer of accountability.
This documentation also reduces back-and-forth emails like, "Did you make that change I asked for?" Stakeholders can see progress instantly, with notes offering a "guided tour" of the work. This minimizes the need for impromptu meetings or lengthy email threads.
For high-stakes projects, consider platforms that offer built-in audit logs. These logs track all user activity and changes, ensuring compliance and transparency. Tools like BoastImage combine robust version control with detailed audit logs, making it easy to track annotations while keeping the client experience simple and user-friendly.
Store All Annotation Feedback in One Place
Keeping all feedback in a single, organized repository works hand-in-hand with your version control system, ensuring that every piece of input is easily accessible during each design iteration. When feedback is scattered across email threads, Slack messages, and random text screenshots, it creates chaos. Your team ends up wasting hours trying to track down fragmented input. By centralizing annotation feedback, you establish a single source of truth where stakeholders can view a complete and cohesive picture of the project’s progress.
This approach has tangible benefits. A large number of agencies cite client communication as their biggest challenge, and consolidating feedback directly addresses the root cause of many project delays. Centralizing feedback also eliminates confusion caused by misnamed files and ensures everyone is always working on the most up-to-date version.
Use a Single Platform for Feedback Collection
The easiest way to centralize feedback is by using a platform that simplifies the process for external stakeholders. Many traditional tools require clients to create accounts or navigate complex dashboards, leading to low participation rates - often around 40%. The solution? A platform offering login-free access. Clients can simply click a link, leave their comments directly on the design, and move on.
BoastImage exemplifies this approach by allowing external collaborators to give feedback without the hassle of account creation. Clients can comment directly on web pages, images, or PDFs with just a link. Meanwhile, your team benefits from features like structured version control, threaded conversations, and Kanban boards - without exposing clients to unnecessary complexity. This streamlined process can boost client participation rates to over 60%, dramatically reducing design revision cycles.
"Stop hunting through emails, Slack messages, and text screenshots. Every piece of feedback lives where it belongs - on the actual design." - BoastImage
Another advantage of using such platforms is the ability to maintain contextual annotations. These annotations remain pinned to specific design elements, creating a visual history of the project. This becomes invaluable when clients revisit past decisions months later, as you can easily show how the design evolved and the reasoning behind key choices.
Once feedback is collected in one place, the next step is to organize it effectively.
Organize Feedback by Project and Version
Centralizing feedback is just the beginning. To make it truly actionable, you need to organize it by project and version. This allows for quick access and seamless comparisons. Group feedback into client or campaign folders, and structure it by version timelines to enable instant side-by-side reviews.
Version control is your best friend here. It lets you update iterations with a single click while keeping previous versions readily accessible. Stakeholders can easily compare, say, version 1 with version 3, complete with all associated comment threads. So when someone asks, "What changed since the last round?" you can provide an answer immediately, with all the context intact.
To further streamline the process, label annotations by priority. Encourage reviewers to tag comments as “must-change,” “question,” or “nice-to-have.” This helps designers focus on the most critical tasks first. Additionally, set clear acceptance criteria before each review round. Defining what “done” looks like for a specific version keeps feedback focused and prevents the dreaded scope creep.
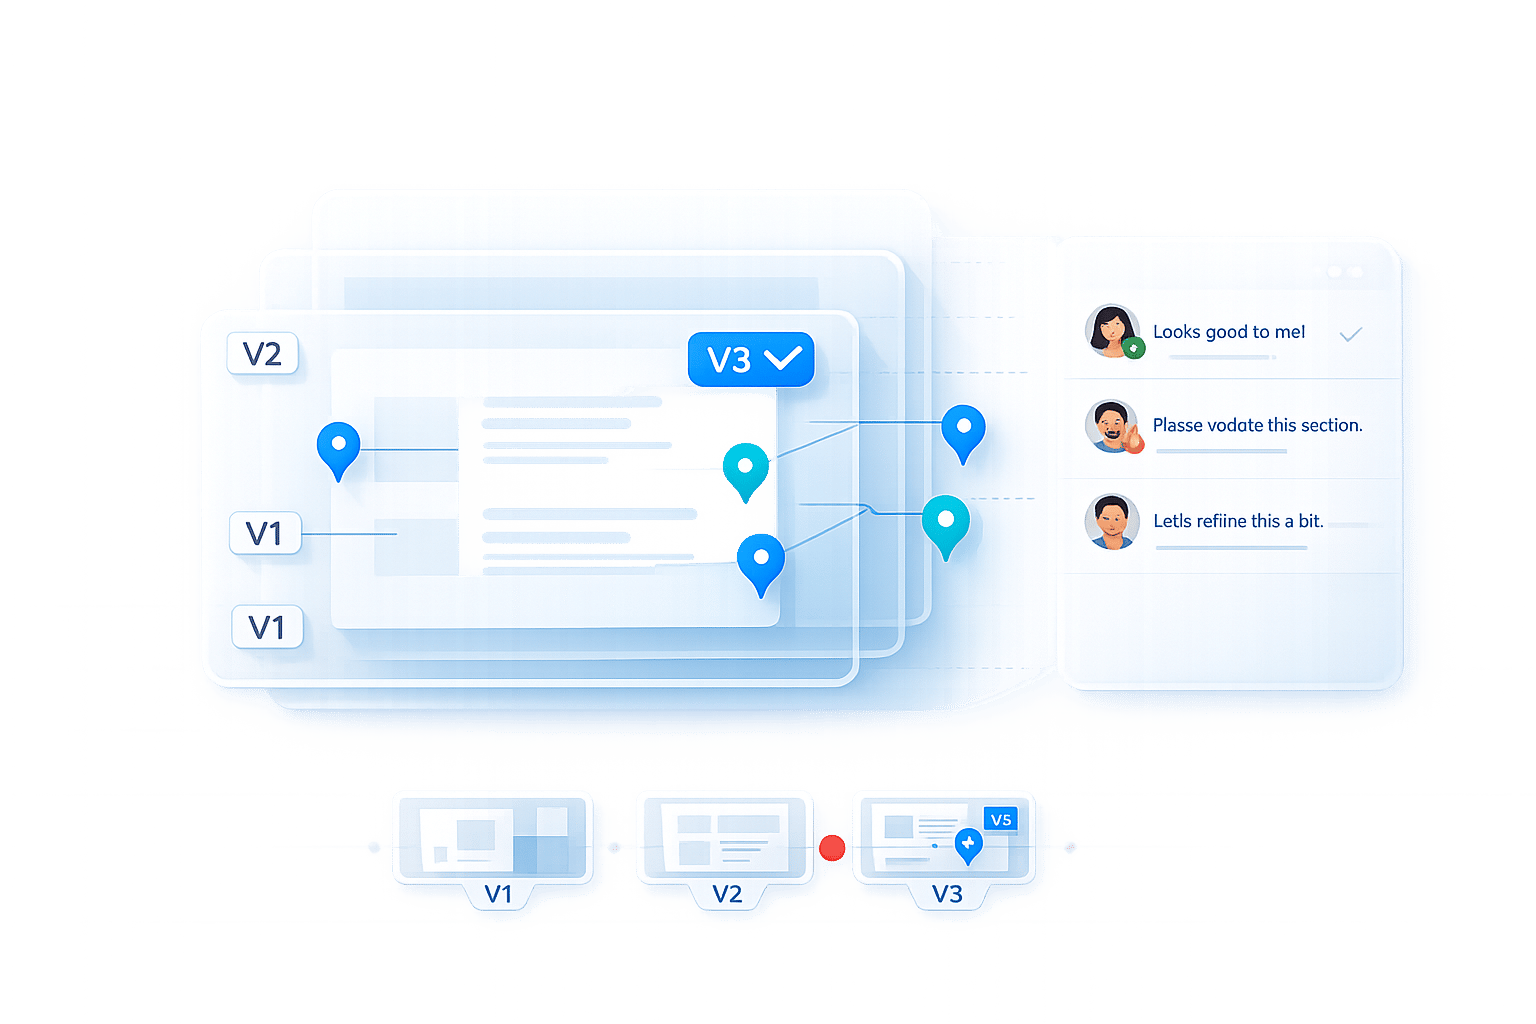
Use Side-by-Side Comparison Tools
Once your feedback is centralized and organized by version, the next step is to make it simple to spot what’s actually changed. That’s where side-by-side comparison tools come in. These tools let you display two design versions simultaneously, making it easier to track progress without wading through endless comment threads. Visual comparisons are far quicker and more intuitive than text-based reviews.
Typically, these tools place two versions side by side - version 2 on the left and version 3 on the right. Features like synchronized navigation ensure that actions like scrolling or zooming in one view automatically mirror the other. This is especially handy for reviewing multi-page PDFs or video content. With this setup, you can dive into more advanced visual diff features.
Identify Changes Between Iterations
Visual diff tools take comparisons further by automatically highlighting differences between versions. For example, difference highlighters can mark changes in color, alignment, or text, making them easy to spot at a glance. Some tools even include an overlay slider, allowing you to slide between two overlaid images to catch subtle layout tweaks or color adjustments.
"Implementing a specialized design or document version control system helps... by allowing designers to see side-by-side comparisons, automatically highlighting any differences."
- Filestage
It’s worth noting that pixel-level highlighters work best when file size and exposure remain consistent; otherwise, even minor differences might trigger false positives. For text-heavy documents, like lengthy brochures, tools with auto-compare text features can identify added or removed text, saving you the hassle of manually scanning through paragraphs. These precise highlights make stakeholder reviews more efficient.
Make Stakeholder Reviews Faster
By visually clarifying updates, these tools play a key role in speeding up your version control process. Side-by-side comparisons allow stakeholders to skip re-reading long annotation histories or digging through old emails. Instead, they can quickly confirm whether their feedback has been implemented by comparing the two versions directly. This visual approach simplifies approvals, letting reviewers focus on what matters without switching tabs or relying on memory.
"Essential to any approval process is the ability to confirm that the changes requested were properly executed by the production or creative team."
- ReviewStudio
To keep the review process smooth, it’s crucial to lock previous versions so no new feedback can be added to outdated iterations. This ensures everyone stays focused on the most recent version while still having older versions for reference. When a stakeholder asks, "Did you make the change I requested?" you can pull up the side-by-side view and show exactly what’s been updated. Tools like BoastImage make this process effortless: upload a new version, and clients can immediately see the changes without any extra work.
Conclusion
Keeping annotation versions organized doesn’t have to be complicated. By following four straightforward steps - using consistent naming conventions, setting up a clear version control system, centralizing feedback, and leveraging side-by-side comparison tools - you can create a workflow that’s both smooth and effective. These steps not only eliminate confusion over file names but also speed up approval processes and increase client feedback rates from 40% to over 60%.
The benefits of these methods are clear: quicker approvals, less time spent on revisions, and projects that stay on track and within budget. When clients can simply click a link to review and comment - without needing to sign up for accounts or learn new tools - they’re far more likely to respond promptly.
"Versioning is necessary to provide the full record of your project development. The ability to manage, track, and compare different versions of files is essential for ensuring project success, avoiding feature creep, and delivering projects on time."
- ReviewStudio
This is especially crucial when you consider that 78% of agencies cite client communication as their biggest hurdle. That’s why BoastImage was designed to tackle this issue head-on. With BoastImage, clients just click a link, leave comments, and they’re done. Meanwhile, you gain access to powerful tools like version control, task management, and Kanban boards - all starting at just $9.95/month for the Solo plan.
Why not give these practices a try? Start with one project: create a clear naming convention, centralize your feedback, and use comparison tools to monitor changes. These small adjustments can lead to faster approvals and fewer revisions in your upcoming projects.
FAQs
What’s the best way to handle versioning across multiple file types?
Managing versioning for various file types in design projects requires a structured approach. Start by implementing a clear version control system to keep iterations organized and accessible. Use consistent file labeling to avoid mix-ups, and lock older versions to prevent accidental edits. Tools that allow side-by-side comparisons can make it easier to track changes and maintain clarity throughout the project.
For added efficiency, consider using specialized software with built-in versioning features. These tools are particularly useful for handling PDFs, images, or web pages, helping to streamline the entire process and minimize confusion.
How do we prevent feedback on outdated design versions?
To prevent confusion over outdated designs, it's crucial to label and organize your files clearly. This way, everyone can easily identify the most recent version. Use tools that offer version control features - like locking older versions or designating a default "latest" version. Make sure to communicate which file is current and limit edits or comments on outdated versions. This keeps all feedback centered on the most up-to-date design, saving time and avoiding unnecessary revisions.
How can we get clients to leave faster, clearer annotations?
Streamline how you gather feedback and set clear expectations from the start. Tools like BoastImage allow clients to comment directly on designs without needing logins or complicated onboarding. This speeds up response times and makes collaboration easier.
Be sure to give clear instructions for providing detailed, actionable feedback. Also, set boundaries for revisions to minimize unhelpfully vague comments. Keeping all feedback in a single platform with features like version control and task management helps maintain clarity. Plus, it eliminates delays caused by juggling scattered channels like email or messaging apps.