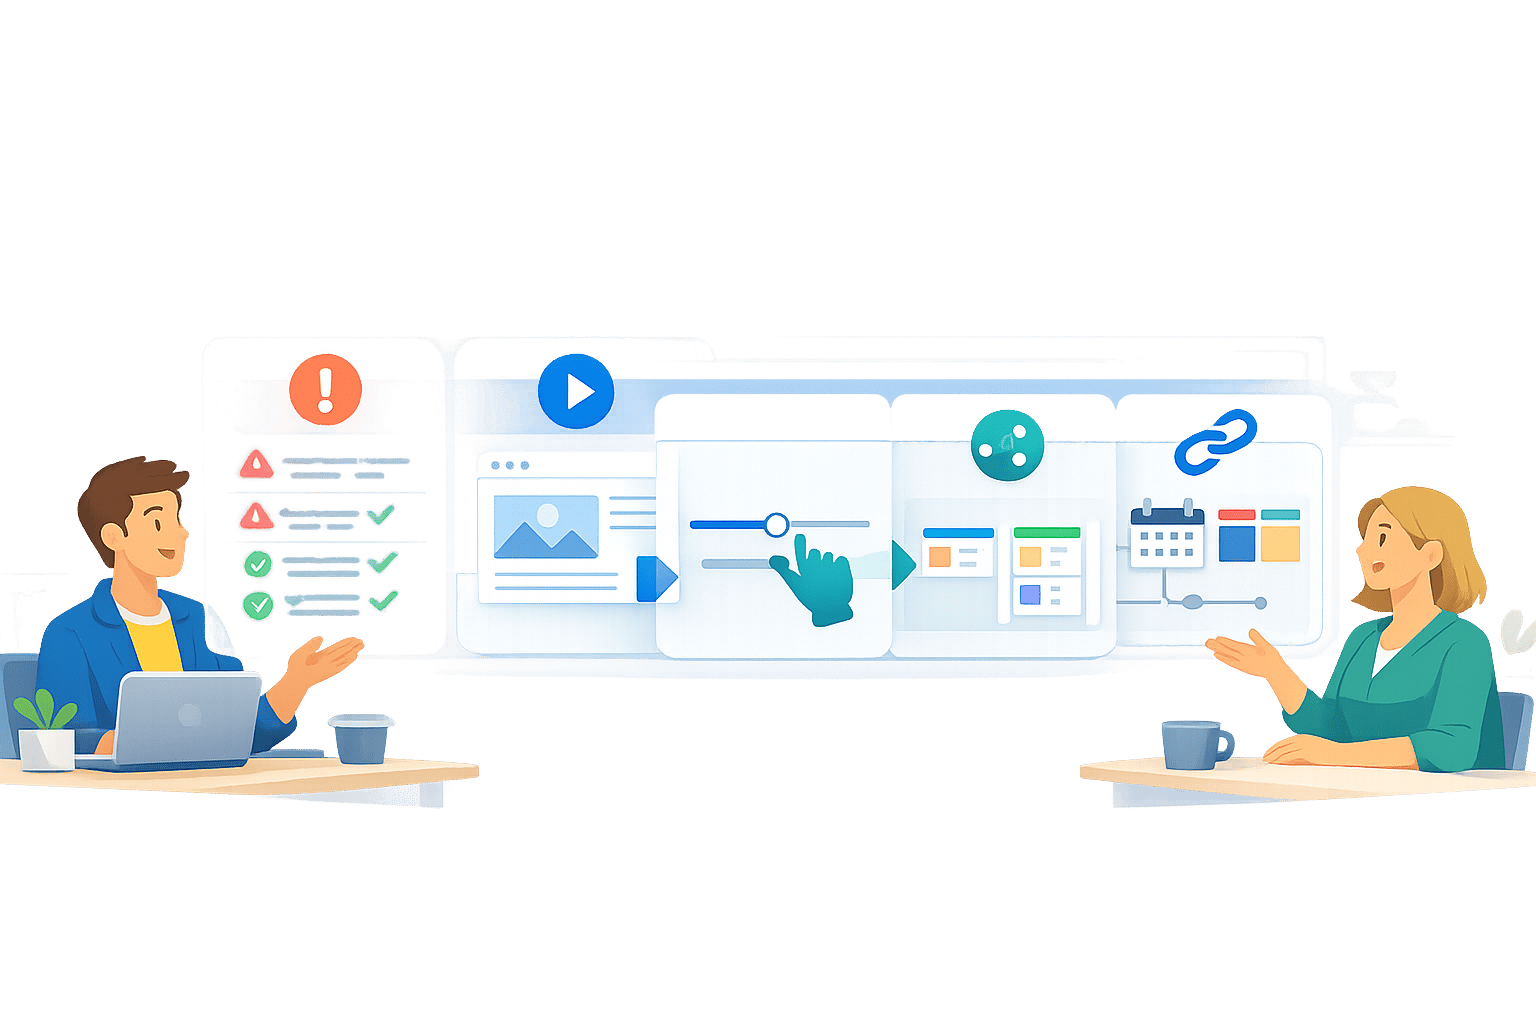
How to Introduce New Tools to Clients
Getting clients to adopt a new tool can be tricky, but it doesn’t have to be. Here’s the key: focus on their needs, simplify the process, and show how the tool solves their problems. A well-executed introduction saves time, reduces confusion, and strengthens client relationships.
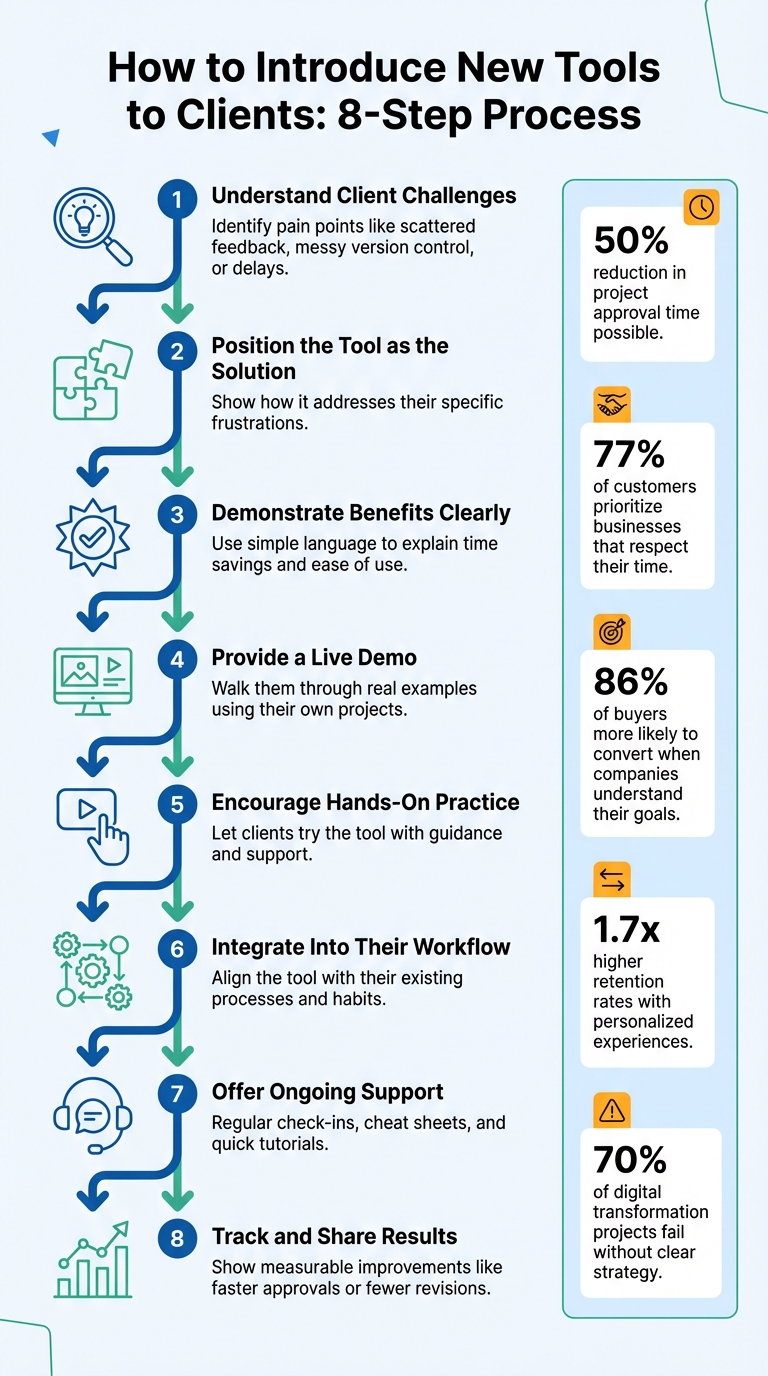
Key Steps:
- Understand client challenges: Identify pain points like scattered feedback, messy version control, or delays.
- Position the tool as the solution: Show how it addresses their specific frustrations.
- Demonstrate benefits clearly: Use simple language to explain how the tool saves time and makes their work easier.
- Provide a live demo: Walk them through real examples using their own projects.
- Encourage hands-on practice: Let clients try the tool with guidance and support.
- Integrate into their workflow: Align the tool with their existing processes and habits.
- Offer ongoing support: Regular check-ins, cheat sheets, and quick tutorials keep them confident.
- Track and share results: Show measurable improvements like faster approvals or fewer revisions.
By following these steps, you’ll not only ensure tool adoption but also build trust and long-term partnerships with your clients.
8-Step Process for Introducing New Tools to Clients
4 Steps to Launching a New Tool That People Actually Use
sbb-itb-32f6eb2
Step 1: See Things from Your Client's Point of View
Before rolling out any new tool, start by understanding the gaps in your client’s current workflow. Pinpoint their frustrations and challenges. When you frame the tool as a solution to these specific issues, it feels like a natural fit rather than an imposed change. This groundwork is crucial for customizing your approach in the steps that follow.
Find Problems in Their Current Process
Ask the right questions to uncover where things are breaking down. Use tools like a strategic briefing template or a kickoff meeting to dig into their day-to-day operations. What tasks are unnecessarily repetitive? Where does feedback get delayed? Who or what is causing bottlenecks?
"The goal is to find out why your client approached you - their pain points and to learn more about their customers, goals and products." - Malin Lernhammar, Co-founder, Kayla
Keep an eye out for common red flags, such as:
- Endless email chains chasing feedback
- Messy version control (e.g., files named "final_v2_FINAL")
- Feedback scattered across multiple platforms, leading to lengthy explanations
By centralizing content approval, you can cut project approval time by as much as 50%.
Don’t stop at speaking with management. Talk to the actual end users who will interact with the tool every day. A disconnect between decision-makers and users often results in underutilized features. Also, identify a team "cheerleader" - someone who can show how the tool benefits their specific team and encourage adoption.
Present the Tool as the Solution
Once you’ve identified the pain points, position the tool as the fix. Highlight how its features directly address the frustrations you’ve uncovered. For instance, if communication is a problem, demonstrate how visual feedback can simplify it. If version control is an issue, explain how the tool automatically organizes files.
"Review your understanding of the project goals by restating their objectives and goals in your own words, following up with any clarifying rational or inspirational questions." - Benten Woodring, Graphic Designer
Customize your presentation by showing how the tool benefits different roles within the organization. When clients see how the tool solves their specific challenges, it feels less like adopting new software and more like eliminating a persistent headache. Resistance fades, and they’re ready to embrace the change.
Step 2: Explain What the Tool Does for Them
Focus on turning client frustrations into clear advantages. Instead of rattling off specs, show how your tool solves their problems. For instance, instead of saying "login-free access", highlight how it means "stakeholders can comment instantly without the hassle of setting up an account." This shift from features to benefits makes the tool’s value obvious.
Show Clients What They'll Gain
Highlight how your tool saves time and reduces headaches. A study found that 77% of customers prioritize businesses that respect their time. Using a tool like BoastImage, for example, lets clients give feedback on designs, web pages, or PDFs with just a click - no logins, accounts, or training needed. This frictionless process addresses a common issue: clients often delay feedback because the process feels too cumbersome.
Visual feedback tools also eliminate the guesswork and confusion of vague email threads. Instead of typing something like, "Can you make the logo a little bigger and move it slightly to the left?" clients can simply click on the exact spot and leave a comment. Nathan Williams explains:
"Rather than write up a small book I can quickly use the provided tools to visually capture the problem and point, encircle, and write a note connected to the needed changes. It has saved us so much time and increased productivity."
When clients understand they'll get faster approvals, better communication, and fewer back-and-forth emails, they’re more likely to embrace the tool. Keep your explanation straightforward to make the benefits crystal clear.
Keep Your Language Simple and Clear
Ditch the jargon. Words like "version control", "audit trails", or "centralized content approval" might sound impressive, but they can confuse clients who just want to get the job done. Instead, explain it in plain terms: "You’ll always see the latest version automatically, so there’s no need for email chains with names like 'final_v2'" or "You can track who’s reviewed the content and see what still needs approval - anytime."
"Clients appreciate when complicated information has already been processed and analyzed, and they see the final result – simple and comprehensive output with no excessive terms." - ClickHelp Team
Adapt your message to your audience. Executives care about big-picture results like ROI, while creative teams want to hear how the tool cuts down on repetitive tasks. A simple “cheat sheet” with contact info, response times, and FAQs can also help manage expectations while keeping the focus on what the tool delivers - not how it works behind the scenes. The clearer and simpler your explanation, the quicker clients will adopt the tool.
Step 3: Show the Tool Working
A live demo is your best ally - it builds trust quicker than any detailed explanation ever could. Instead of just talking about how the tool works, let your clients see it in action. This approach naturally transitions from discussing benefits to showcasing practical use.
Walk Them Through the Basics
Keep your demo concise and deliver an early "wow" moment that highlights the tool's value. For instance, if you're presenting BoastImage, demonstrate how a client can click on a shared link, pinpoint a specific element on a webpage or design, and leave a comment - all without needing to create an account or log in. This simple action immediately showcases the tool's core advantage.
"I try to flip the script and encourage the customer to bring everyone together in one room from the start to maximize engagement." - Linda Escobar, Onboarding Principal for Customer Experience at Fullstory
This strategy minimizes confusion and ensures all stakeholders are aligned during the demo. For added convenience, provide a one-page guide or a short, easy-to-digest video instead of overwhelming them with lengthy instruction manuals.
Use Their Actual Projects for Examples
Generic demos often fall flat. Instead, tailor your demonstration to the client's needs by using their actual projects. Research shows that 86% of buyers are more likely to convert when they see that the company understands their specific goals. Before the meeting, ask for relevant assets like logos, style guides, or current project files to make the demo feel personal.
Showcase a real-world scenario with their materials. For example, demonstrate how a marketing manager can leave feedback directly on a homepage mockup, allowing the CEO to approve updates instantly while keeping all comments centralized. Focus on two or three key "a-ha moments" that directly address their pain points, rather than overwhelming them with every feature. The closer the demo aligns with their daily workflow, the easier it is for them to see how the tool fits seamlessly into their process.
Step 4: Let Clients Try It and Share Their Thoughts
Once you've completed the demo, it’s time to let clients get hands-on with the tool. This step not only builds confidence but also helps them see how the tool integrates into their daily workflow. Shift the focus from observing to actively doing by guiding them through a structured practice session.
Run a Practice Session Together
Organize a workshop where clients can test the tool with real-time guidance. Use the Rule of Three: demonstrate three essential tasks first, then gradually introduce more once they’re comfortable. Before the session, ensure clients have access to their own environment. sending a test-project link is a great way to let them practice tasks like leaving comments or marking areas on live pages, even without creating accounts. Tailor the session to their specific needs. For example, if you're working with a marketing director, walk them through reviewing a homepage mockup and approving changes.
"Positive reinforcement goes a long way in effective onboarding, but for maximum engagement, we recommend perks for your team. Gamify the process."
- Tara Storozynsky, Extensis
Make sure to provide simple reference materials that they can use later. These quick guides can help them feel more confident when working independently.
Adjust Based on What Clients Tell You
After the practice session, ask for direct feedback on how clear and user-friendly the tool feels. As Jennifer Bourn, Founder of JenniferBourn.com, explains:
"Asking for feedback shows clients you care about their thoughts and feedback and demonstrates your commitment to quality and constantly improving your level of service."
Take their input seriously - whether it’s praise or criticism. If clients mention unclear instructions or confusing terms, address those issues right away. If they seem hesitant or resistant to using the tool, dig deeper to understand their concerns. Are they worried about extra workload? Do they feel it disrupts their current process? Use this information to better highlight the tool’s advantages in a way that aligns with their priorities.
Keep an eye out for recurring challenges or questions, as these can reveal gaps in your onboarding process. By refining and automating parts of the system based on client feedback, you could save up to 50% of project management hours. Lastly, don’t let the conversation end after the session - schedule regular follow-ups via calls or emails. This keeps the door open for clients to share ongoing concerns as they continue to use the tool.
Step 5: Make the Tool Part of Their Regular Work
Once clients are comfortable with the tool through hands-on sessions, the next step is to weave it into their daily routines. The goal is to make the tool feel like a natural extension of their workflow rather than an extra task. Begin by integrating it into their existing processes. For example, if they rely heavily on emails or spreadsheets, demonstrate how the tool centralizes project details, saving time by reducing scattered information.
It's also important to align with their established habits. As Ben Brigden, Content Marketing Manager at Teamwork.com, puts it:
"The more a provider can do to understand and relate to the usually unconscious norms of the client, the more the client will feel at ease and experience a sense of reliability".
For clients hesitant to fully commit, encourage a gradual transition. Let them use the tool alongside their familiar systems until they feel confident enough to make the switch.
Give Clients Help When They Need It
Ongoing support is key to ensuring clients adopt the tool successfully. Provide various support options so they can choose what suits them best. For instance, you could:
- Host dedicated "office hours" for live Q&A sessions.
- Create a simple one-page "Business Cheat Sheet" with essential contact details, business hours, response times, and FAQs.
- Share short video tutorials that walk through common tasks, offering an easy reference without requiring immediate assistance.
Another effective strategy is to identify an internal champion within the client’s team. This person can set an example by using the tool effectively and sharing strategies for maximizing its benefits. Kathy Nguyen, Senior Product Manager at Fullstory, explains:
"In a champion, you'd ideally want someone who is highly engaged with the tool throughout its lifetime so they can identify strategies about the most effective ways to get maximum value out of it".
Stay connected with regular follow-ups. Start with bi-weekly check-ins and gradually move to monthly calls as clients grow more confident. After each meeting, send a brief email summarizing key points and decisions to ensure clarity. This consistent communication reinforces trust and reduces the risk of misunderstandings. It’s worth the effort - acquiring a new client is 16 times more expensive than maintaining an existing one.
Track Results and Share Them
Support alone isn’t enough; you need to show clients how the tool is making a difference. Define clear success metrics, such as faster approval cycles or fewer revision rounds. For example, if approval times drop from five days to two, share that data during follow-ups to highlight the tool’s impact.
Monitor adoption behaviors like the date of the first project creation, the number of assets uploaded, or how often the client interacts with the tool. Many tools also provide audit trails, which can offer valuable insights. Sharing measurable results not only builds trust but also helps clients demonstrate the tool’s value to their managers. Businesses that create personalized experiences often achieve 1.7 times higher customer retention rates compared to those that don’t.
Take tools like BoastImage as an example. With its login-free, user-friendly design, it integrates effortlessly into daily workflows, making feedback routines simple and effective. By focusing on seamless integration, ongoing support, and measurable outcomes, you can ensure long-term client satisfaction and success.
Conclusion
Review the Client-First Approach
Introducing new tools doesn’t have to be a headache. The secret? Prioritize the client’s experience at every stage. Start by addressing their frustrations, clearly outlining the benefits, and showing how the tool works using their real projects. Add ongoing support into the mix, and adoption feels seamless instead of forced. BoastImage is a great example of this - there’s no need for account creation or complicated onboarding. Clients can simply click, comment, and move on. As Malin Lernhammar, Co-founder of Kayla, puts it:
"Evidence shows us again and again that making sure clients have a great on-boarding experience is the best way to hang on to them for the long haul".
The numbers back this up. Personalizing client experiences can lead to 1.7 times higher retention rates. On the flip side, 70% of digital transformation projects fail because organizations lack a clear, engaging strategy to bring users on board. By keeping things simple and avoiding overly complex workflows, you can prevent clients from falling back into old habits like endless email chains. A smooth start paves the way for lasting collaboration.
Focus on Long-Term Client Relationships
A solid onboarding process is just the beginning. To build lasting partnerships, you need to keep the momentum going. Regular communication and ongoing support are key to strengthening the relationship over time. Routine check-ins allow you to address any concerns and showcase measurable results - whether it’s faster approval cycles or fewer revision rounds. Plus, retaining clients is far more cost-effective than constantly seeking new ones.
As Hachem Ramki, Writer and Digital Marketer, explains:
"A well-defined client onboarding process isn't just about ticking boxes: it's the foundation for a successful working relationship".
FAQs
How do I handle clients who refuse to use the tool?
When dealing with client resistance, the first step is to understand where their hesitation comes from - it could be fear of change or simply unfamiliarity with the tool. Keep the lines of communication open and focus on explaining how the tool makes their feedback process easier. For example, you can point out user-friendly features like the ability to leave comments without needing to log in.
If resistance continues, try a gradual approach. Address their specific concerns, introduce the tool step by step, and show them how it adds value to their workflow. Above all, patience and empathy are essential. Pushing too hard can backfire and lead to even more resistance.
What metrics show the tool is improving feedback?
Metrics that show better feedback include NPS (Net Promoter Score), CSAT (Customer Satisfaction), and CES (Customer Effort Score). Beyond these, tools like sentiment analysis and tracking feedback trends over time can give a clearer picture of engagement and satisfaction levels. Together, these metrics help paint a detailed view of how users are reacting to and using the tool.
How long should onboarding take before it feels routine?
When onboarding is organized effectively, it can become second nature in just about 14 minutes. This quick timeframe highlights how a clear and efficient process can simplify the experience, ensuring it fits seamlessly into a short session or the first few interactions.