Client Onboarding Checklist for Clear Expectations
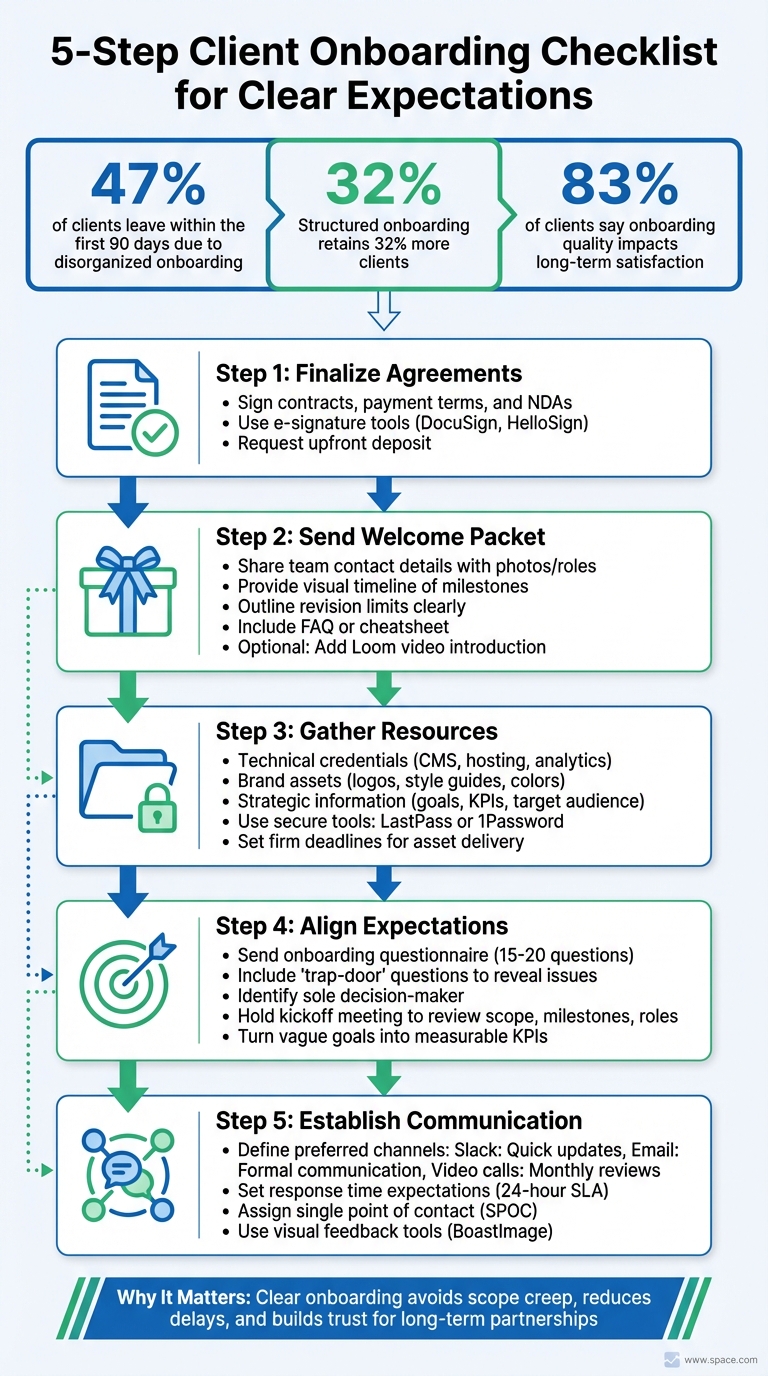
47% of clients leave within the first 90 days - often due to disorganized onboarding. But a structured process can retain 32% more clients and set the stage for long-term success. Here’s how to streamline your client onboarding:
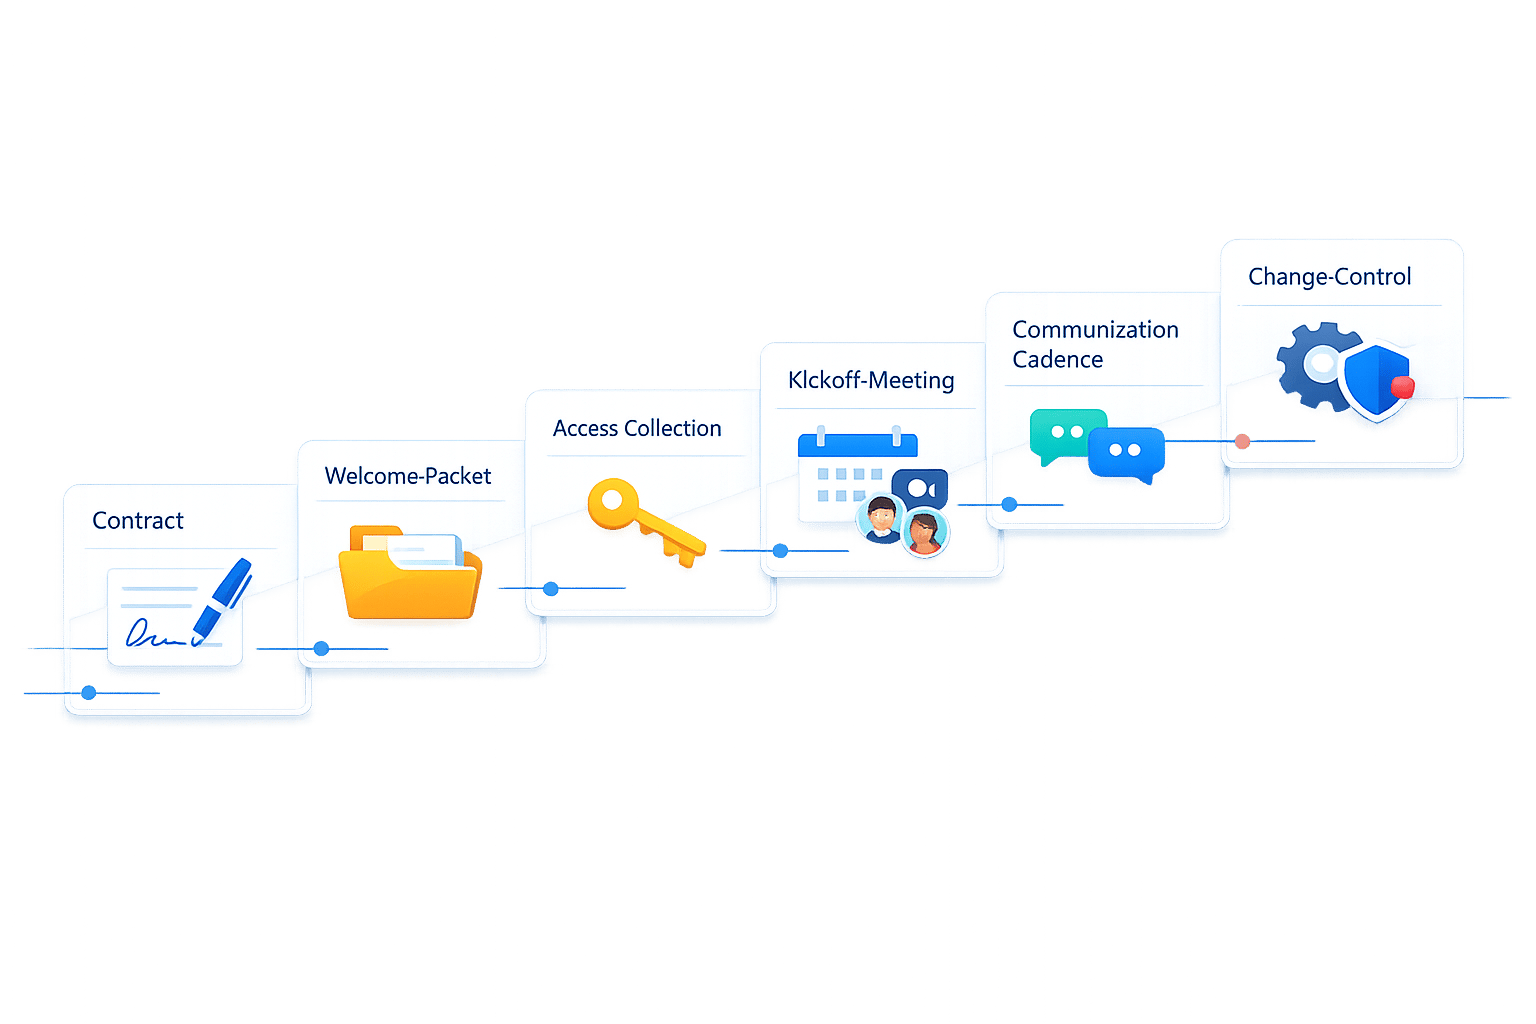
- Finalize agreements: Ensure contracts, payment terms, and NDAs are signed. Use tools like DocuSign for efficiency. Request an upfront deposit to mitigate risks.
- Send a welcome packet: Share contact details, timelines, revision limits, and FAQs. Consider adding a Loom video introduction for a personal touch.
- Gather resources: Secure credentials, brand assets, and strategic details through secure tools like LastPass. Set firm deadlines for asset delivery.
- Align expectations: Use an onboarding questionnaire to clarify goals, challenges, and decision-makers. Follow up with a detailed kickoff meeting to review scope, milestones, and roles.
- Establish communication: Define preferred channels (e.g., Slack for quick updates, email for formal communication) and set response time expectations.
Why it matters: 83% of clients say onboarding quality impacts long-term satisfaction. A clear, organized process avoids scope creep, reduces delays, and builds trust. This checklist ensures you start every partnership on the right foot.
5-Step Client Onboarding Process for Agency Success
7-STEP Client Onboarding Checklist for Agencies! (+FREE TEMPLATE)
sbb-itb-32f6eb2
Pre-Onboarding Preparation
Before your first client meeting, it’s essential to handle the behind-the-scenes work that ensures both sides are protected and aligned. This groundwork lays the foundation for a smooth and productive project launch. Here's how to get started.
Complete Administrative Agreements
Finalize all legal and financial agreements before diving into the project. These documents should outline key details like deliverables, timelines, payment terms, and intellectual property rights. If you'll be handling sensitive business information, include a Non-Disclosure Agreement (NDA). For industries with strict regulations, complete any required Know Your Customer (KYC) and Anti-Money Laundering (AML) checks.
Make sure to gather tax forms, such as W-9s, and confirm billing details, including your invoicing schedule and accepted payment methods. It's also wise to request an upfront deposit. As AgencyAnalytics explains, "While it's optional to request a payment up-front, requesting a deposit at the beginning of your contract is good practice. Neglecting to do so puts you at risk of non-payment, which is never a fun interaction".
To streamline this process, use e-signature tools like DocuSign or HelloSign, and a website feedback tool for design approvals. Additionally, consider creating a one-page "Expectations Agreement" that simplifies responsibilities, feedback cycles, and success criteria in plain language. This complements your formal contract and ensures everyone is on the same page.
Send a Welcome Packet
After signing the contracts, share a welcome packet to provide your client with everything they need to know upfront. This packet should include team contact details (with photos and roles), preferred communication methods, business hours, expected response times, and a visual timeline of key project milestones.
Be sure to outline revision limits clearly here to avoid misunderstandings later. For example, if the project allows for two rounds of revisions, state that explicitly. Including a FAQ or "cheatsheet" with answers to common questions can also save time and reduce back-and-forth emails. To add a personal touch, consider recording a short Loom video introducing your team and walking through the next steps - it’s a small gesture that can make a big difference.
Once the client feels oriented, focus on gathering the resources needed to kick off the project without delay.
Request Access and Resources
Prepare a checklist or intake form for the client to share all necessary access and materials. This might include technical credentials like CMS logins (e.g., WordPress, Shopify), hosting and domain registrar details, Google Analytics access, advertising accounts (e.g., Google Ads, Meta Business Manager), and social media logins. Request brand assets such as high-resolution logos (.AI, .SVG), style guides, color palettes, and product photography.
In addition to technical and visual assets, ask for strategic information that aligns with your project goals. This includes clearly defined objectives, measurable KPIs, target audience profiles, competitor lists, and unique selling points. Identify key contacts within the client’s team for technical, marketing, or sales-related questions.
Avoid requesting passwords through email. Instead, use secure password-sharing tools like LastPass or 1Password to ensure credentials are exchanged safely. Set firm deadlines for asset delivery and explain that technical setup cannot begin until all required access is provided.
Discovery and Expectation Setting
Once all the administrative and preparatory steps are wrapped up, the next phase focuses on understanding the client’s needs and defining success. This stage is crucial - it connects the dots between signing contracts and starting the actual project work. By aligning expectations early, you set the stage for a productive kickoff meeting and a smooth collaboration.
Send an Onboarding Questionnaire
The onboarding questionnaire is your tool to gather critical details about the client’s business, goals, and expectations. Keep it concise - around 15 to 20 questions - to ensure clients complete it without feeling overwhelmed. To save time, pre-fill any information you already know.
Focus your questions on areas such as:
- Business basics: Key details about the company and its operations.
- Goals: What outcomes the client is looking to achieve.
- Target audience: Ideal customer profiles, common objections, and factors driving loyalty.
- Competitive landscape: Insights into competitors and market position.
- Challenges: Specific obstacles the client is facing.
- Project details: Scope, deliverables, and timelines.
- Operational preferences: Communication styles, feedback tools, and frequency.
Make sure to include “trap-door” questions that can reveal potential issues. For example, ask: "Have you had problems working with a similar service in the past?" This helps uncover any past frustrations or unrealistic expectations. Similarly, "Who is the sole decision-maker for this project?" ensures you know who has the final say, helping you avoid delays caused by conflicting opinions or "design by committee."
Set a firm deadline - 10 business days - for the questionnaire to be completed. This isn’t just about efficiency; it’s about setting the tone for the relationship. As Crawford puts it:
"Client onboarding is not about being polite... It is a risk management protocol. It is the specific period where you train the client on how to treat you".
Review and Align Internally
Once the client submits their responses, it’s time to review the information and align internally. Before jumping into the client kickoff meeting, hold an internal session with your team to go over the questionnaire, assign roles, and anticipate challenges.
During this internal meeting:
- Break down the project scope into clear, actionable tasks.
- Identify dependencies to ensure smoother workflows.
- Highlight quick wins - small, early tasks you can complete to build immediate trust and momentum with the client.
This internal alignment is non-negotiable. Why? Because nearly half (47%) of clients leave agencies within the first 90 days due to disorganized onboarding. On the other hand, agencies with structured onboarding processes retain 32% more clients.
Client Kickoff Meeting
The kickoff meeting marks the official start of the project. By this point, you’ve handled the paperwork, gathered insights through the questionnaire, and synced up internally. This meeting builds on all the groundwork laid during pre-onboarding and discovery. And it’s a big deal - 90% of customers believe companies could do a better job of welcoming new clients.
To set the stage, send a detailed agenda at least 48 hours before the meeting. This gives the client time to prepare questions and ensures the right people show up. As Stewart Dunlop from LinkBuilder.io explains:
"Your goal with client onboarding should be to use it as an extension of the sales process, impressing your new client and setting the tone for a long engagement".
With your prep work in place, here’s how to make the kickoff meeting run smoothly.
Define Roles and Responsibilities
Start by introducing all key team members and outlining their roles. On your side, this could include the project manager, creative lead, technical lead, or others critical to the project. Then, have the client introduce their team, including their main point of contact and anyone who will make creative or technical decisions.
When everyone knows who’s responsible for creative calls, technical integrations, and project management, it reduces confusion and unnecessary back-and-forth. Assign a single point of contact (SPOC) for each side to streamline communication and avoid delays.
Once roles are clear, move on to the project’s scope and timeline.
Confirm Project Scope and Timeline
Review the Scope of Work (SOW) in detail. Go through it line by line to ensure both parties are on the same page about what’s included and what might be part of a future phase. This step is crucial to avoid scope creep and set clear expectations for deliverables.
Share a visual roadmap that outlines key milestones, deadlines for each phase, and any points where client input is required. Be specific about dependencies and deadlines: for instance, if the client needs to deliver brand assets by March 15, 2026, to meet an April 1, 2026, launch, make this crystal clear.
Turn vague goals into measurable KPIs. Instead of saying, "increase website traffic", aim for something concrete like "achieve 15% traffic growth within 3 months".
Once the scope and timeline are agreed upon, the next step is to document everything.
Document and Share Key Decisions
If possible, record the meeting for reference. Within 24 hours, send a follow-up email summarizing key decisions, the next steps, and a request for formal sign-off. This documentation ensures clarity and reduces the chance of disputes later.
Your follow-up should include the finalized timeline, agreed deliverables, communication protocols (preferred channels, meeting frequency, response times), and immediate action items for both teams. Use checkboxes or sign-off forms to track approvals at critical stages - this keeps the project on track and prevents scope creep.
Clear communication and thorough documentation here set the tone for a successful partnership. Keep in mind that 74% of clients will switch to a competitor if they feel the onboarding process is overly complicated or confusing.
Communication and Feedback Processes
After a well-structured kickoff, maintaining clear and consistent communication is key to keeping clients engaged and confident. Establishing clear protocols from the outset can prevent confusion and uncertainty.
Victor Karpenko, CEO and founder of SeoProfy, highlights a common issue:
"Lots of agencies win the contract, then disappear for weeks while they 'prepare things' in the background. This silence almost always makes clients nervous".
To avoid this, prioritize communication during the first 30 days. Frequent updates during this period can alleviate client concerns and set the tone for a transparent working relationship. Beyond that, create a system to ensure communication remains steady and predictable.
Set Communication Protocols
Start by building on the roles and project scope established earlier. Define how and when communication will happen. For example:
- Use Slack or instant messaging for quick questions or updates.
- Reserve email for formal communications and weekly updates.
- Schedule video calls for in-depth monthly reviews.
Avoid informal platforms like WhatsApp or text messages to maintain professionalism and clear boundaries.
Next, set expectations for response times. A Service Level Agreement (SLA) can specify response times - for instance, replying to non-urgent client requests within 24 business hours. This helps clients feel supported without needing to chase updates.
Consistency is also crucial. Weekly status updates keep clients informed without overwhelming them, while monthly reviews offer a chance to discuss strategy. During the early stages, daily or every-other-day check-ins can help build trust and momentum.
| Communication Type | Recommended Frequency | Primary Tool |
|---|---|---|
| Quick Queries | As needed | Slack / Instant Messaging |
| Status Updates | Weekly | Email / Project Dashboard |
| Deep-Dive Reviews | Monthly | Video Call / Meeting |
| Deliverable Feedback | Per milestone | Visual Feedback Tool |
| Urgent Issues | Immediate | Phone / Direct Message |
Consider introducing "micro-updates" for milestones, even for smaller tasks. For example, a quick note like, "We've completed the wireframes and will send them for review tomorrow", can close communication gaps that often lead to client anxiety. This approach has been shown to improve post-launch client satisfaction by 18%.
Set Up BoastImage for Visual Feedback
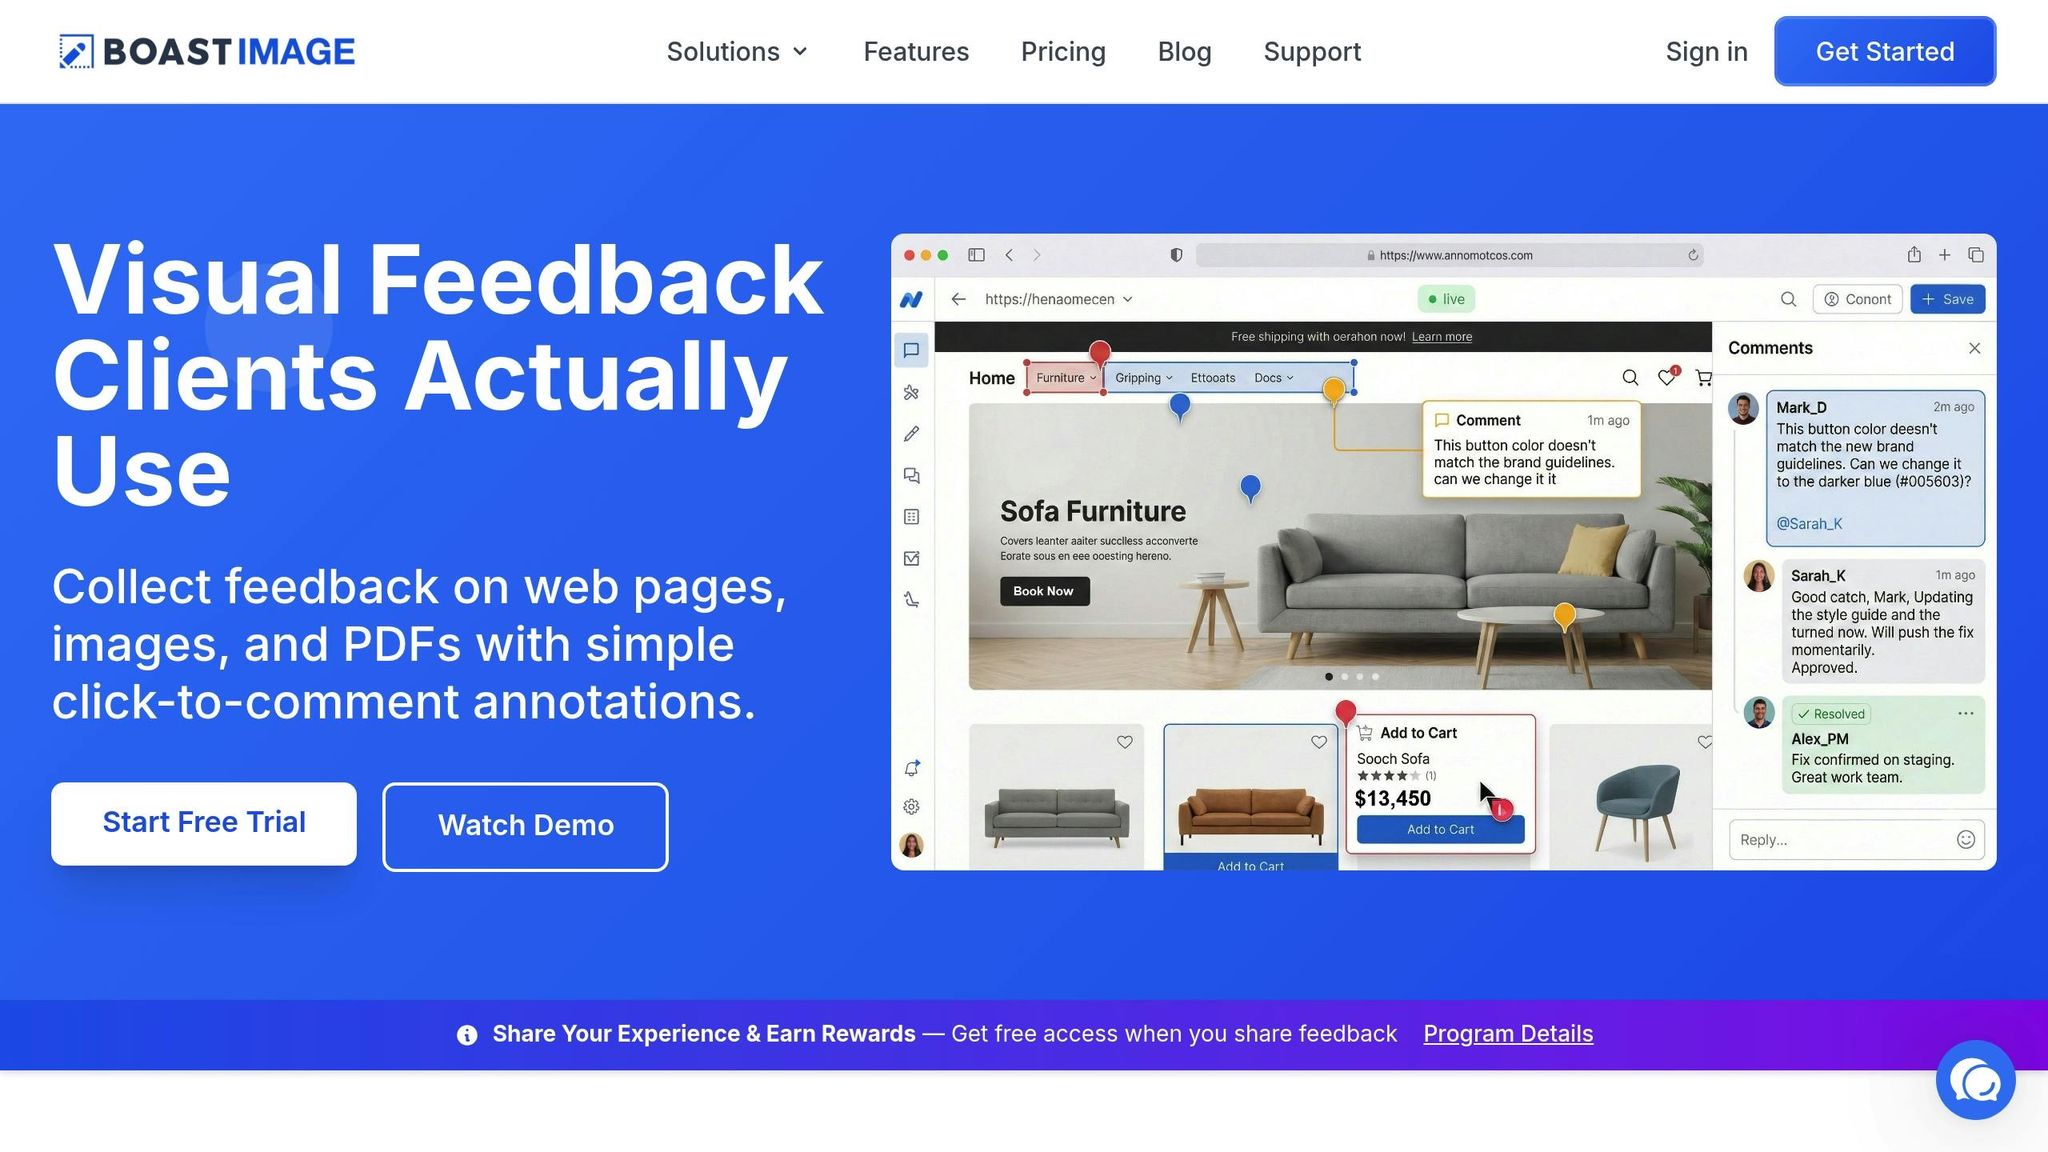
When dealing with visual deliverables like web pages, mockups, or PDFs, a centralized feedback system can make all the difference. Scattered feedback through emails or chats often leads to confusion and delays. A dedicated tool like BoastImage simplifies this process, ensuring all comments and revisions are in one place.
BoastImage allows clients to provide feedback directly on visual deliverables without needing to create an account. This streamlined process eliminates technical barriers, making it easier for clients to engage and reducing the chances of vague or delayed feedback. On the backend, features like version control and Kanban boards help your team stay organized.
Here’s how it works: Right after the kickoff, send clients a BoastImage link with a brief explanation. Let them know they can click and comment without needing to sign up. For agencies, the Team plan ($19.95 per user per month) supports multiple client projects, while freelancers can start with the Solo plan at $9.95/month.
Sarah Chen, Medical Director at Publicis Health France, shares her experience:
"Our clients really appreciate the ease of use and being able to have a clear overview of their projects... it helps us to nourish the working relationship we have with our clients".
Project Infrastructure Setup
Building a solid project infrastructure ensures that expectations are clear from the start. It also helps maintain organization, which is key to avoiding client churn. When everything is structured - files, tasks, and communication - it’s easier to stay on track and make clients feel involved and confident in the process.
Create Shared Workspaces
Centralizing all project elements - contracts, timelines, deliverables, progress reports, and invoices - reduces scattered communication and keeps everything in one place. This can be achieved through a dedicated client portal or by using shared workspaces within project management tools.
Platforms like Asana, Trello, or Monday.com are great for real-time task tracking and can integrate seamlessly into your client portal. As Graham Lumley puts it:
"When we're onboarding new clients, there's a huge checklist of tasks to go through: getting access to or creating ad accounts, websites, Google Analytics properties... It's a tedious and lengthy process".
A centralized workspace streamlines this process and makes it manageable.
To further enhance organization, set up role-based permissions so that team members and clients only access what’s relevant to them. This minimizes confusion and enhances security. For sharing credentials securely, use tools like LastPass or 1Password instead of email. Additionally, create dedicated communication channels within platforms like Slack or Microsoft Teams. For instance, channels can be categorized into "General Updates", "Feedback", or "Technical Support" to keep conversations focused.
Adding a searchable FAQ or knowledge base to the client portal can save time by providing instant answers to common questions. Short Loom videos (around two minutes) can also be useful for walking clients through the workspace and tools.
Once all files and communication are centralized, the next step is to outline the project timeline to maintain clarity and accountability.
Document the Project Timeline
After organizing the workspace, focus on creating a detailed project timeline. This timeline ensures alignment and accountability by breaking the project into phases - like Discovery, Execution, and Launch - with specific tasks and milestones for each phase. Clearly define the deliverables, their format, and acceptance criteria at every stage to eliminate misunderstandings.
Dependency mapping is a key element here. Show how delays in client inputs - like providing assets or approving drafts - can affect subsequent deadlines and, ultimately, the launch date. Stuart L. Crawford explains this well:
"If you approve the wireframes by date X, we launch by date Y. If you delay, the launch moves".
This straightforward "if/then" logic sets expectations early and reinforces accountability.
Using project management tools instead of static spreadsheets allows for real-time progress tracking. Assign specific owners to each milestone to avoid confusion, and set up automated reminders for deadlines to reduce manual follow-ups.
Here’s an example of how timeline components can be structured:
| Timeline Component | Purpose | Stakeholder Accountability |
|---|---|---|
| Phases & Milestones | Highlights key progress points | Sets clear expectations for both parties |
| Dependencies | Shows task relationships | Emphasizes how delays affect the timeline |
| Approval Deadlines | Establishes feedback windows | Keeps the project moving during reviews |
| Assigned Owners | Assigns responsibility | Clarifies who is in charge of each task |
| Deliverable Specs | Defines what "done" looks like | Ensures deliverables meet client standards |
To make the timeline more accessible, pair a high-level visual roadmap with a detailed task list. After reviewing the timeline in meetings, send a follow-up summary within two hours to document agreed-upon dates and decisions. This practice keeps everyone on the same page and reduces potential miscommunication.
Managing Scope Creep and Client Expectations
Once your project timeline is set, protecting it from unexpected changes is crucial. Scope creep occurs when small, seemingly harmless requests accumulate without proper approval, ultimately disrupting your budget and deadlines. The onboarding phase is the perfect time to establish clear boundaries and processes to avoid this.
Define Change Request Procedures
During onboarding, implement a formal change request process. This ensures that any alterations to the original project scope - no matter how minor - are documented, evaluated for their impact on timelines and budgets, and approved before any work begins.
Stuart L. Crawford, Creative Director at Inkbot Design, suggests addressing this head-on during your kickoff meeting with what he calls an "Anti-Scope Creep" talk:
"We want to be flexible, but to keep the project on budget, any requests outside of this list will be billed at our hourly rate of £X. We will always warn you before incurring extra costs".
This kind of upfront transparency helps set expectations while minimizing possible friction. When a client suggests something beyond the agreed scope, consider framing it as a "Phase 2" opportunity. This approach acknowledges their idea’s value while keeping the current project on track and opening doors for future collaboration.
Another effective strategy is implementing a "Hard Stop" protocol - no work should begin until the Statement of Work is signed, and the deposit is received. This prevents situations where clients ask for "just a quick adjustment" before formalizing the agreement, which can lead to undocumented scope changes.
Visual tools like flowcharts or mind maps can be helpful during onboarding to outline the project’s scope clearly. After discussing these details, follow up with a concise email summarizing the agreed-upon scope. This serves as a written record that can help resolve any disputes later. These proactive steps ensure that everyone is on the same page from the very beginning.
Track Client Satisfaction Early
While setting clear boundaries is key, keeping an eye on client satisfaction during the early stages of your relationship is just as important. Surprisingly, 68% of client churn is tied to unresolved frustrations during onboarding. addressing these issues early—and managing design feedback and revisions effectively—can prevent small concerns from escalating into deal-breakers.
One way to do this is by sending a brief post-onboarding survey 30 days after the kickoff. Keep it simple - three or four questions about what might have felt slow or confusing. This automated feedback loop helps you identify and resolve potential issues during the critical first 90 days, a period when 47% of clients are most likely to leave.
In addition to surveys, schedule informal check-ins to gauge how the client feels overall. Haley Babich, Platform Implementation Manager at Vendasta, highlights the value of this approach:
"Know that even if they're not asking questions, you should follow up with your clients frequently because that's how you'll retain them".
These casual conversations often reveal concerns that clients might hesitate to share through formal channels. Use this feedback to address gaps, such as providing additional training on tools or platforms. Tackling these issues early can prevent frustration and improve retention.
Make sure to store all client feedback in your CRM. This ensures your team can act on it consistently, keeping everyone aligned and accountable.
Conclusion
Client onboarding lays the groundwork for a strong, productive agency-client relationship. The time and effort you dedicate during those crucial first weeks can shape the entire partnership.
Using a structured checklist ensures every client experiences a smooth and professional onboarding process. This approach builds trust, minimizes confusion, and eliminates the disorganization that can lead to early client dissatisfaction. By standardizing tasks like contracts and kickoff meetings, you not only save time but also create a scalable system that keeps your team focused and efficient. A well-thought-out checklist also acts as a safeguard against scope creep and miscommunication.
Effective communication and the right tools are game-changers. When clients know how and when to reach you, where to provide feedback, and what to expect, projects run more smoothly. Tools like BoastImage make it easy for clients to share visual feedback - no logins or extra steps required. This simplicity keeps projects moving forward and avoids delays caused by endless back-and-forth emails. Clear communication not only prevents misunderstandings but also strengthens client relationships.
Agencies with structured onboarding processes retain 32% more clients. The secret to success isn’t just a stunning portfolio - it’s a seamless onboarding experience that sets clear goals and tackles potential issues upfront. Considering that acquiring a new client costs 5 to 25 times more than keeping an existing one, starting strong is critical. A client-first onboarding process is your ticket to building lasting partnerships and achieving long-term success.
FAQs
What’s the minimum onboarding checklist I need to start?
Kicking off client onboarding the right way sets the tone for a productive relationship. Here's how to get started:
- Gather key client details: Collect contact information, project goals, and any specific expectations they have. This ensures you're aligned from the beginning.
- Clarify expectations upfront: Define the project scope, deliverables, timelines, and how communication will work. Transparency here avoids misunderstandings later.
- Agree on communication tools: Decide on the platforms you'll use (email, Slack, etc.) and how often updates will be shared.
- Provide onboarding resources: Share any guides, templates, or process overviews to help clients understand how things will progress.
- Develop a project roadmap: Map out milestones, assign responsibilities, and set clear deadlines to keep everyone on track.
By following these steps, you create a solid foundation for collaboration and ensure a smooth start to the project.
How do I prevent scope creep without upsetting the client?
To keep scope creep in check while nurturing a positive client relationship, it’s essential to establish clear boundaries and expectations from the start. One way to do this is by using a detailed onboarding checklist to outline the project scope and deliverables. Be upfront about what’s included in the agreement and communicate openly about any potential changes.
When adjustments come up, handle them transparently. Tools like formal agreements and project tracking software can help you stay organized and manage changes effectively. If the scope shifts, discuss any additional costs or timeline adjustments right away. This ensures everyone is on the same page and helps prevent unnecessary misunderstandings.
How can I get faster, clearer visual feedback from clients?
To speed up and simplify the feedback process, start by setting clear expectations from the beginning. Use tools like BoastImage, which allow clients to comment directly on your work without needing to create accounts or log in. This makes the process more accessible and efficient.
During onboarding, guide clients on how to provide useful feedback. For example, explain what areas they should focus on and how to handle version control. This helps eliminate unclear input, making feedback more actionable and significantly reducing delays in the review process.