
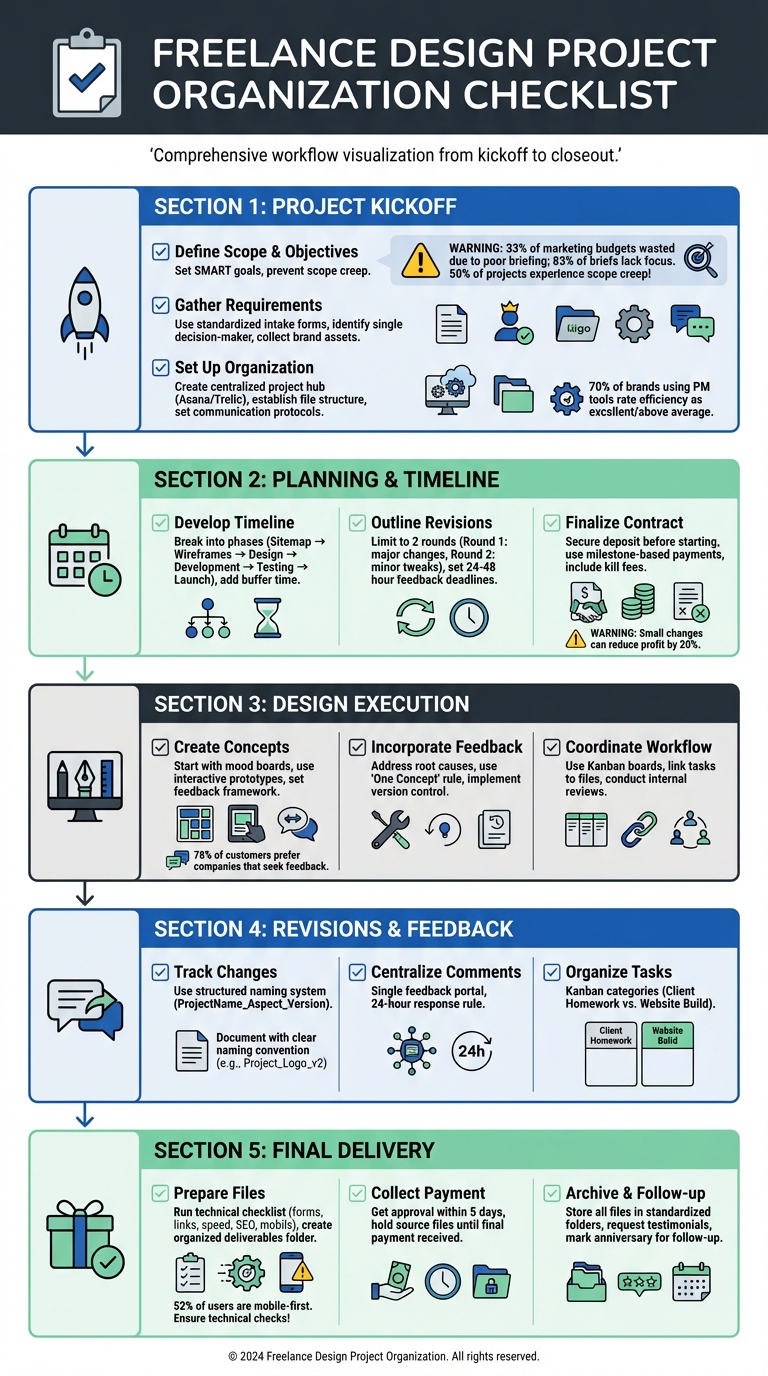
Checklist for Freelance Design Project Organization
Freelance design projects can get messy without a system. Missed deadlines, scattered files, and unclear communication can harm your reputation and income. This checklist helps you stay organized, protect yourself legally, and deliver professional results clients will respect. Here’s what it covers:
- Kickoff: Define project scope, set SMART goals, and gather all client requirements upfront.
- Organization: Use project hubs like Asana or Trello, structured file systems, and clear communication protocols. This prevents clients ghosting feedback tools during critical phases.
- Timeline: Break projects into phases, set deadlines, and allow buffer time to handle delays.
- Revisions: Limit revision rounds, consolidate client feedback, and charge for extra changes.
- Contracts & Payments: Use milestone-based payments, secure deposits, and include kill fees.
- Final Delivery: Test everything, organize deliverables, and hold source files until final payment.
Complete Freelance Design Project Workflow Checklist
Project Kickoff Checklist
Define Project Scope and Objectives
The first meeting with a client is crucial - it sets the stage for the entire project. Research highlights that 33% of marketing budgets go to waste due to poor briefing, and 83% of professionals believe most project briefs lack focus. These stats underline how unclear briefs can derail even the best projects.
Start by setting SMART goals. Avoid vague objectives like "improve the website." Instead, pinpoint specific business challenges, such as reducing cart abandonment or increasing engagement. Tie your design work directly to the client’s business goals. As Zack Kinslow from Worksuite wisely says:
"Clarity is kindness, after all. And clarity leads to final projects with fewer revisions, higher satisfaction, and a more mutually beneficial relationship with your contractors."
Clearly outline what’s included (and not included) in the project scope to prevent scope creep. If a client brings up a new feature during the kickoff, use the "parking lot" method - acknowledge the idea and suggest revisiting it as part of a future phase after the current project is complete. Also, ask the client what success looks like three months down the road. This ensures alignment on both immediate and long-term goals.
Once objectives are nailed down, shift your focus to gathering all the resources you’ll need.
Gather Client Requirements and Resources
With the scope defined, it’s time to collect all the necessary design resources. Use a standardized intake form rather than relying on scattered email threads. This form should capture essential details like objectives, budget, deadlines, and technical requirements.
Plan a discovery call to dig deeper into the client’s business goals, frustrations with current assets, and past experiences with freelancers. During the kickoff meeting, identify a single decision-maker (or limit it to two) to avoid conflicting feedback. Assign clients specific tasks - such as "submit brand assets by Feb 14" - to keep the project on track.
Create a detailed checklist of required assets, including style guides, logos, brand imagery, custom fonts, existing copy, and any reference materials. Secure technical access early, such as hosting logins, CMS credentials, and payment gateway access. These small details can cause big delays if overlooked. Record your kickoff call using tools like Zoom or Google Meet so you have a clear record of the agreed terms.
Once you’ve gathered everything, focus on organizing it efficiently.
Set Up Project Organization Structure
Now that goals are clear and resources are in hand, it’s time to set up a system to keep everything running smoothly. Start by creating a centralized project hub using tools like Asana, Trello, or Freedcamp. This hub will serve as the go-to place for all communication, tasks, and updates.
Organize client materials with a structured digital filing system. Set up a dedicated folder for the client in a cloud storage platform like Google Drive, Dropbox, or OneDrive. Use consistent naming conventions and divide files into subfolders, such as Assets, Business (contracts and invoices), Client Input, Deliverables, Design (source files), and Resources. This approach saves time and prevents chaos later.
Establish clear communication protocols from the start. Decide on a primary communication method - whether it’s through your project management tool or Slack - and set expectations for response times. A 24-hour turnaround for client feedback is a good rule of thumb to avoid delays. As Erin Flynn, Founder of Design Bread, aptly puts it:
"The best PMS is the one that you actually use - not the one with the most bells and whistles."
Choose tools that fit your workflow, not ones that complicate it.
Finally, think about how clients will provide feedback on visual work. Whether it’s marking up PDFs or sending descriptive emails, aim for methods that make it easy for clients to share actionable input without needing to learn complicated software. A tool like BoastImage can simplify this process, allowing clients to give clear feedback with minimal hassle.
sbb-itb-32f6eb2
Planning and Timeline Management
Develop a Detailed Project Timeline
A well-structured timeline is the backbone of any successful project. Start by breaking the process into clear phases: Sitemap → Wireframes → Homepage Design → Full-page Designs → Development → Testing → Launch. This phased approach eliminates confusion and creates defined checkpoints for both you and the client.
Set client homework deadlines for each phase. Be specific about when you need items like high-resolution logos, brand colors, product photos, or written copy. A practical way to manage this is by splitting your project management board into two lists: "Client Homework" and "Website Build". This makes it crystal clear who’s responsible for what and when.
Don’t forget to add buffer time between tasks. Extra days can save you from unexpected delays. Also, dedicate a specific phase for testing and QA, where you’ll check forms, broken links, site speed, SEO, and mobile responsiveness. With 52% of web users accessing sites from mobile devices, skipping this step isn’t an option.
Align your timeline with milestone-based payments. Typically, you’ll start with a deposit (10% to 50%) before kickoff, followed by payments tied to milestones like mockup approval or copy completion. As the Self-Made Web Designer team puts it:
"You don't have a project until you have a contract and a first payment."
Finally, structure your revision rounds to keep the project moving forward.
Outline Revision Rounds and Feedback Cycles
Once your timeline is set, clearly defining revision rounds ensures the project stays on track. Nearly 50% of projects experience scope creep, and even a "small change" can add up to five hours of work across design, development, and QA. To avoid this, include a fixed number of revision rounds in your contract - usually two.
Each round should have a specific focus. Round 1 tackles major structural changes, such as layout adjustments. Round 2 focuses on minor tweaks, like font sizes or color adjustments. This structure ensures revisions don’t spiral into endless rework.
Implement the "Consolidated Feedback Rule": require clients to gather all internal feedback and submit it through a single point of contact. This avoids conflicting instructions from multiple stakeholders, which can derail progress. Set strict deadlines for feedback - 24 to 48 hours works well. If the client misses the deadline, the project moves to the next phase. Following a structured feedback process helps ensure these deadlines are met without sacrificing quality.
Use visual feedback tools instead of email threads. Platforms like BoastImage let clients leave comments directly on designs without needing an account, speeding up the process. You can also record a Loom video explaining your design choices to provide context and avoid vague feedback like "it just feels off".
If clients request revisions beyond the agreed-upon rounds, charge an hourly rate. Setting this expectation upfront helps establish boundaries.
Finalize Contracts and Payment Terms
Work should only begin after you’ve received a signed contract and the initial payment. The contract should clearly define the scope, the number of included revision rounds, and what qualifies as "extra work" to prevent delays.
Use milestone-based payments to keep the project and cash flow aligned. For example, in a $5,000 project, you might charge 25% upfront, 25% at the midpoint milestone, and 50% upon final completion. This ensures you’re compensated for completed work while keeping the client motivated to progress. Common deposit structures include 10% to 25% upfront for larger projects or a 50/50 split for smaller ones.
| Payment Structure | Best For | Pros |
|---|---|---|
| 50/50 Split | Small to medium projects | Easy to manage; ensures strong upfront commitment. |
| Milestone-Based | Large, multi-phase projects | Balances cash flow with progress; reduces risk for both parties. |
| Upfront Deposit (10-25%) | High-ticket/Long-term projects | Lowers the entry barrier for clients while securing the start date. |
Include "kill fees" or abandonment clauses to protect yourself if a client disappears or puts the project on hold indefinitely. Keep signed contracts and payment records in a centralized project hub so both parties can access them throughout the project. Automate invoicing with tools like Stripe, Wise, or Bonsai to schedule payments as milestones are reached.
As Suzanne Scacca wisely points out:
"If their money is on the line, they won't be as likely to flake on it."
Design Execution and Collaboration
Create Initial Concepts and Collect Feedback
Once timelines and revision schedules are in place, it's time to dive into the design process while keeping collaboration front and center. Forget the old approach of presenting polished, near-final designs - it’s inefficient and risky. Instead, start gathering feedback early to keep the project on track and within budget. Begin with mood boards and visual references to establish a shared vision. This step is essential because terms like "modern" or "fresh" can mean vastly different things to different people. Some clients may struggle to visualize abstract concepts, so this alignment phase is critical.
Leverage interactive prototypes over static images. Static mockups often lead to frustrating comments like, "Why doesn’t this button work?" Interactive prototypes, on the other hand, let clients experience the design in action, providing more relevant and actionable feedback.
Tailor your communication to the client’s priorities. As Todd Zaki Warfel, a leadership coach and author, points out:
"Clients... speak business and outcomes and results. So, you may need to establish a basic level of understanding."
Before sharing designs, set a clear feedback framework. Define what kind of feedback you’re looking for (e.g., layout vs. color choices), identify decision-makers, and set firm deadlines - usually 24 to 48 hours. Tools like BoastImage simplify this process by allowing clients to leave comments directly on designs without needing to create an account. This reduces friction and speeds up the process. In fact, 78% of U.S. customers prefer companies that actively seek and value their feedback.
Once you’ve gathered and refined feedback, shift gears to focus on incorporating those insights and iterating on your designs.
Incorporate Feedback and Iterate on Designs
With initial concepts in hand, use the feedback you’ve collected to refine your designs. The key here is to dig into the root cause behind client comments. For example, if a client says, "Make the logo bigger", they might actually be concerned about brand visibility. By addressing the underlying issue, you can offer solutions that align with their broader goals. Encourage clients to focus on describing problems, not solutions - the "why" instead of the "how." If they suggest a specific change, treat it as one possible option rather than a fixed demand.
Stick to the "One Concept" rule to avoid blending multiple ideas into a confusing final design. Present a single, well-thought-out solution, supported by UX principles and data. If the client prefers a less effective option, showcase it alongside your recommendation to explain your reasoning.
To keep things organized, use version control so everyone knows which iteration is current. This is especially important since 50% of projects experience scope creep. Even a small change requiring just 5 hours of work - factoring in design, development, QA, and project management - can eat up 20% of the profit on a $10,000 project. Consolidating feedback through a single point of contact also helps prevent conflicting input from multiple stakeholders.
Once feedback is addressed and designs are refined, focus on streamlining team workflows for smoother collaboration.
Coordinate Tasks and Team Workflow
A centralized project hub is essential for keeping everyone aligned. Avoid using email for task tracking - it’s messy and inefficient. Instead, rely on tools like Kanban boards or list views to visualize daily tasks and track milestones. Studies show that project management tools can significantly improve overall efficiency.
Link tasks directly to relevant design files or documents to save time and reduce confusion. Before delivering anything to the client, conduct internal reviews to catch errors and minimize revisions. Tracking task time is also important for evaluating profitability and adjusting pricing if necessary.
Build brief buffers between tasks to give team members a moment to reset before diving into the next item. Since 52% of global web users are mobile-first, ensure your collaboration tools work seamlessly on mobile devices. Brief video walkthroughs can also clarify design choices and cut down on the need for live meetings.
Revisions and Feedback Management
Track Changes with Version Control
Keeping a detailed record of your design iterations ensures you won’t lose progress or accidentally overwrite important work. Version control lets you roll back to any earlier version without hassle. Instead of cluttering your files with names like "final_v27", try a structured naming system like ProjectName_DesignAspect_VersionNumber to keep things tidy. This method becomes especially handy when clients change their direction or want to revisit an earlier concept. Unlike simple backups, which only capture your latest work, version control systems manage non-linear iterations, allowing you to access any point in your project's history. Tools like Google Drive can handle basic tracking, but they require meticulous organization to avoid overwrites. As Nandini Sharma from ProofHub explains:
"Designers like to work on ideas, not on file management."
Once your versions are safely stored, the next step is to streamline how you handle client feedback.
Centralize Client Comments
When feedback is scattered across emails, text messages, and phone calls, it’s easy for critical details to slip through the cracks. Consolidating all client input in a single feedback portal ensures nothing gets lost. Joey Muething, Product Manager at Appcues, humorously highlights the common frustration:
"Wait, someone actually gets and reads this? I was expecting it to go into a black hole and never hear back."
With tools like BoastImage, clients can click a link and leave comments directly on your designs, simplifying the feedback process. To keep projects on track, set firm deadlines for feedback - 24 hours is a good rule of thumb - and consider using short video walkthroughs (via Loom, for instance) to clarify your ideas and next steps.
After centralizing feedback, it’s time to organize tasks effectively to maintain momentum.
Organize Tasks Using Kanban Boards
Kanban boards are a great way to visualize your project’s progress by categorizing tasks into stages like "To Do", "Doing", and "Done". For design projects, breaking tasks into categories like "Client Homework" (e.g., assets needed from the client) and "Website Build" (your creative work) helps clarify roles and responsibilities. One major perk of Kanban boards is their ability to link files, mockups, and client feedback directly to tasks, saving you time digging through folders. In fact, research shows that 70% of brands using project management tools rate their organizational efficiency as "excellent" or "above average".
Platforms like BoastImage take it a step further by integrating Kanban boards with version control and feedback tools, giving you a structured system while keeping things simple for your clients.
Final Delivery and Project Closeout
Prepare and Deliver Final Files
As you approach the finish line, focus on delivering a seamless handoff. Start by running a technical launch checklist - test all forms, buttons, links, site speed, SEO elements, and mobile responsiveness to ensure everything works perfectly. Organize all the final files into a clearly labeled "Deliverables" folder within the client's project directory.
To make the transition easier for your client, record a Loom video walkthrough of the key assets. These screen-share videos are quicker to produce than written guides and help clients feel more confident navigating their new materials. You might also offer a support grace period - a short window after delivery where you assist with minor questions or tweaks.
Facilitate Client Approval and Collect Payment
Getting client sign-off is crucial. Aim to secure their approval within 5 business days. Include a clause in your contract stating that if the client doesn’t provide feedback within this timeframe, the deliverables will be considered "accepted". Use tools like DocuSign or HelloSign for e-signatures to formalize the approval and maintain a clear legal record.
Hold off on releasing the final high-resolution and source files until the final payment is received. A milestone-based payment structure can simplify this process, such as requiring 50% at project completion. Automate invoicing with tools like Stripe, Bonsai, or FreshBooks to send reminders and apply late fees - typically 1.5% monthly for overdue payments.
Archive the Project and Request Feedback
Once the project is approved and paid for, wrap up by archiving everything. Store all files in a standardized cloud folder. Use subfolders for categories like Assets (logos, fonts), Business (contracts, invoices), Client Input (questionnaires, copy), Deliverables (final files), and Design (source files). Save important documents - emails, contracts, NDAs, and approvals - as PDFs and keep them organized for at least a year.
Don’t forget to ask for feedback. Use a structured form to guide the client’s testimonial, asking about their initial hesitations, the results they’ve experienced, and their favorite part of the process. As Nesha Woolery points out:
"Offboarding includes a lot of little tasks that you can automate and streamline, like asking for testimonials".
Encourage clients to post their feedback as a Google Review, which can boost your credibility and help with search rankings. Finally, mark the website’s launch anniversary or other milestones in your calendar so you can follow up later for potential repeat business.
How To Stay Organized as a Graphic Designer (FULL Airtable Tour)
Conclusion
Staying organized as a freelance designer goes beyond keeping your files in order - it’s about protecting your income and delivering a polished, professional experience that commands higher rates. Did you know nearly 50% of projects experience scope creep? Just one poorly managed change can slash 20% off your profit.
"Creativity without control is just chaos." - Stuart L. Crawford, Creative Director, Inkbot Design
To maintain control, professional designers rely on structured workflows. This includes using signed creative briefs, centralized dashboards, and managing client revision requests in their contracts. They also centralize feedback to avoid the chaos of scattered emails and text messages.
Tools like BoastImage (https://boastimage.com) make managing client feedback effortless. Clients can comment directly on designs without creating accounts or learning complicated software. Meanwhile, you benefit from features like version control and Kanban boards, ensuring a smooth and organized process for both sides.
This checklist serves as your guide to building a professional and profitable design business. With structured workflows, reusable templates, and effective feedback tools, you’ll spend less time managing chaos and more time focusing on your craft. Build this structure into your process, protect your profits, and deliver designs that truly stand out.
FAQs
What should I do if the client won’t provide assets or feedback on time?
Setting clear expectations from the start can help prevent delays. If a client falls behind schedule, gently remind them of the agreed timeline and how delays might affect the project's progress. Always keep a record of your communications, and if necessary, renegotiate deadlines to ensure alignment.
Using tools like BoastImage, designed for client feedback, can simplify the review process and minimize holdups. Being proactive with communication and setting firm deadlines for feedback are key strategies to keep the project moving smoothly.
How do I handle new requests without letting the scope creep?
To keep scope creep at bay, start by creating a detailed scope of work (SOW). This document should clearly define the deliverables, set limits on revisions, and outline key milestones. Share this during your kickoff meetings to ensure everyone is on the same page about expectations.
It’s also smart to use contracts that include revision policies and change order clauses. These can help you manage additional requests without derailing the project. Tools like BoastImage can make client feedback more efficient by minimizing unclear input and keeping all requests organized.
Above all, regular communication is essential. Consistent check-ins can help you stay in control and address potential issues before they grow.
What’s the simplest way to get clear visual feedback from non-technical clients?
Getting clear visual feedback from non-technical clients can be a breeze with a client-first visual feedback tool. These tools let clients add comments directly on the work - no need for creating accounts or going through a complicated setup. This makes it simple for clients to use while keeping communication clear and organized for your team. Behind the scenes, these tools provide the structure teams need, all while keeping the process effortless for the client.